.svg)

Campaign Manager is a powerful broadcast communication tool designed to schedule and send thousands of messages to your audience.
Templates ensure you send the right message every time, while custom parameters allow message content to be personalised, making each recipient feel like they’re receiving a message sent just for them.
Start Sending Now
It’s just 3 steps between you and the power of Campaign Messaging!
-
Upload or create your List of recipients
-
Craft your campaign content
-
Schedule the campaign - or send immediately
Customise Your Experience
There are a ton of features available to customise your Campaign:
- Create and customise templates
- Customise response messages
- Set up forwarding to an email
- Build keyword response workflows
- Set up ’time of day’ sending restrictions
- Manage opt-outs and blocklists
- Callback services and API integration
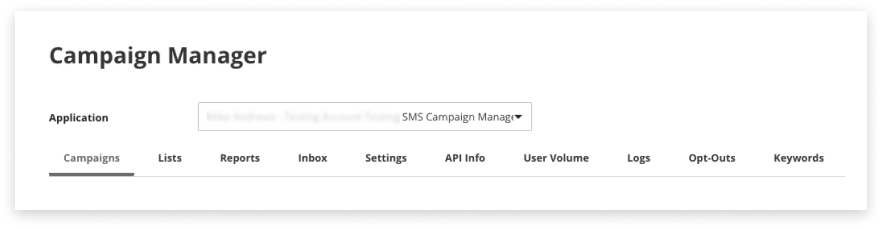
Tabs in Campaign Manager
An overview of the tabs, from left to right on-screen:
-
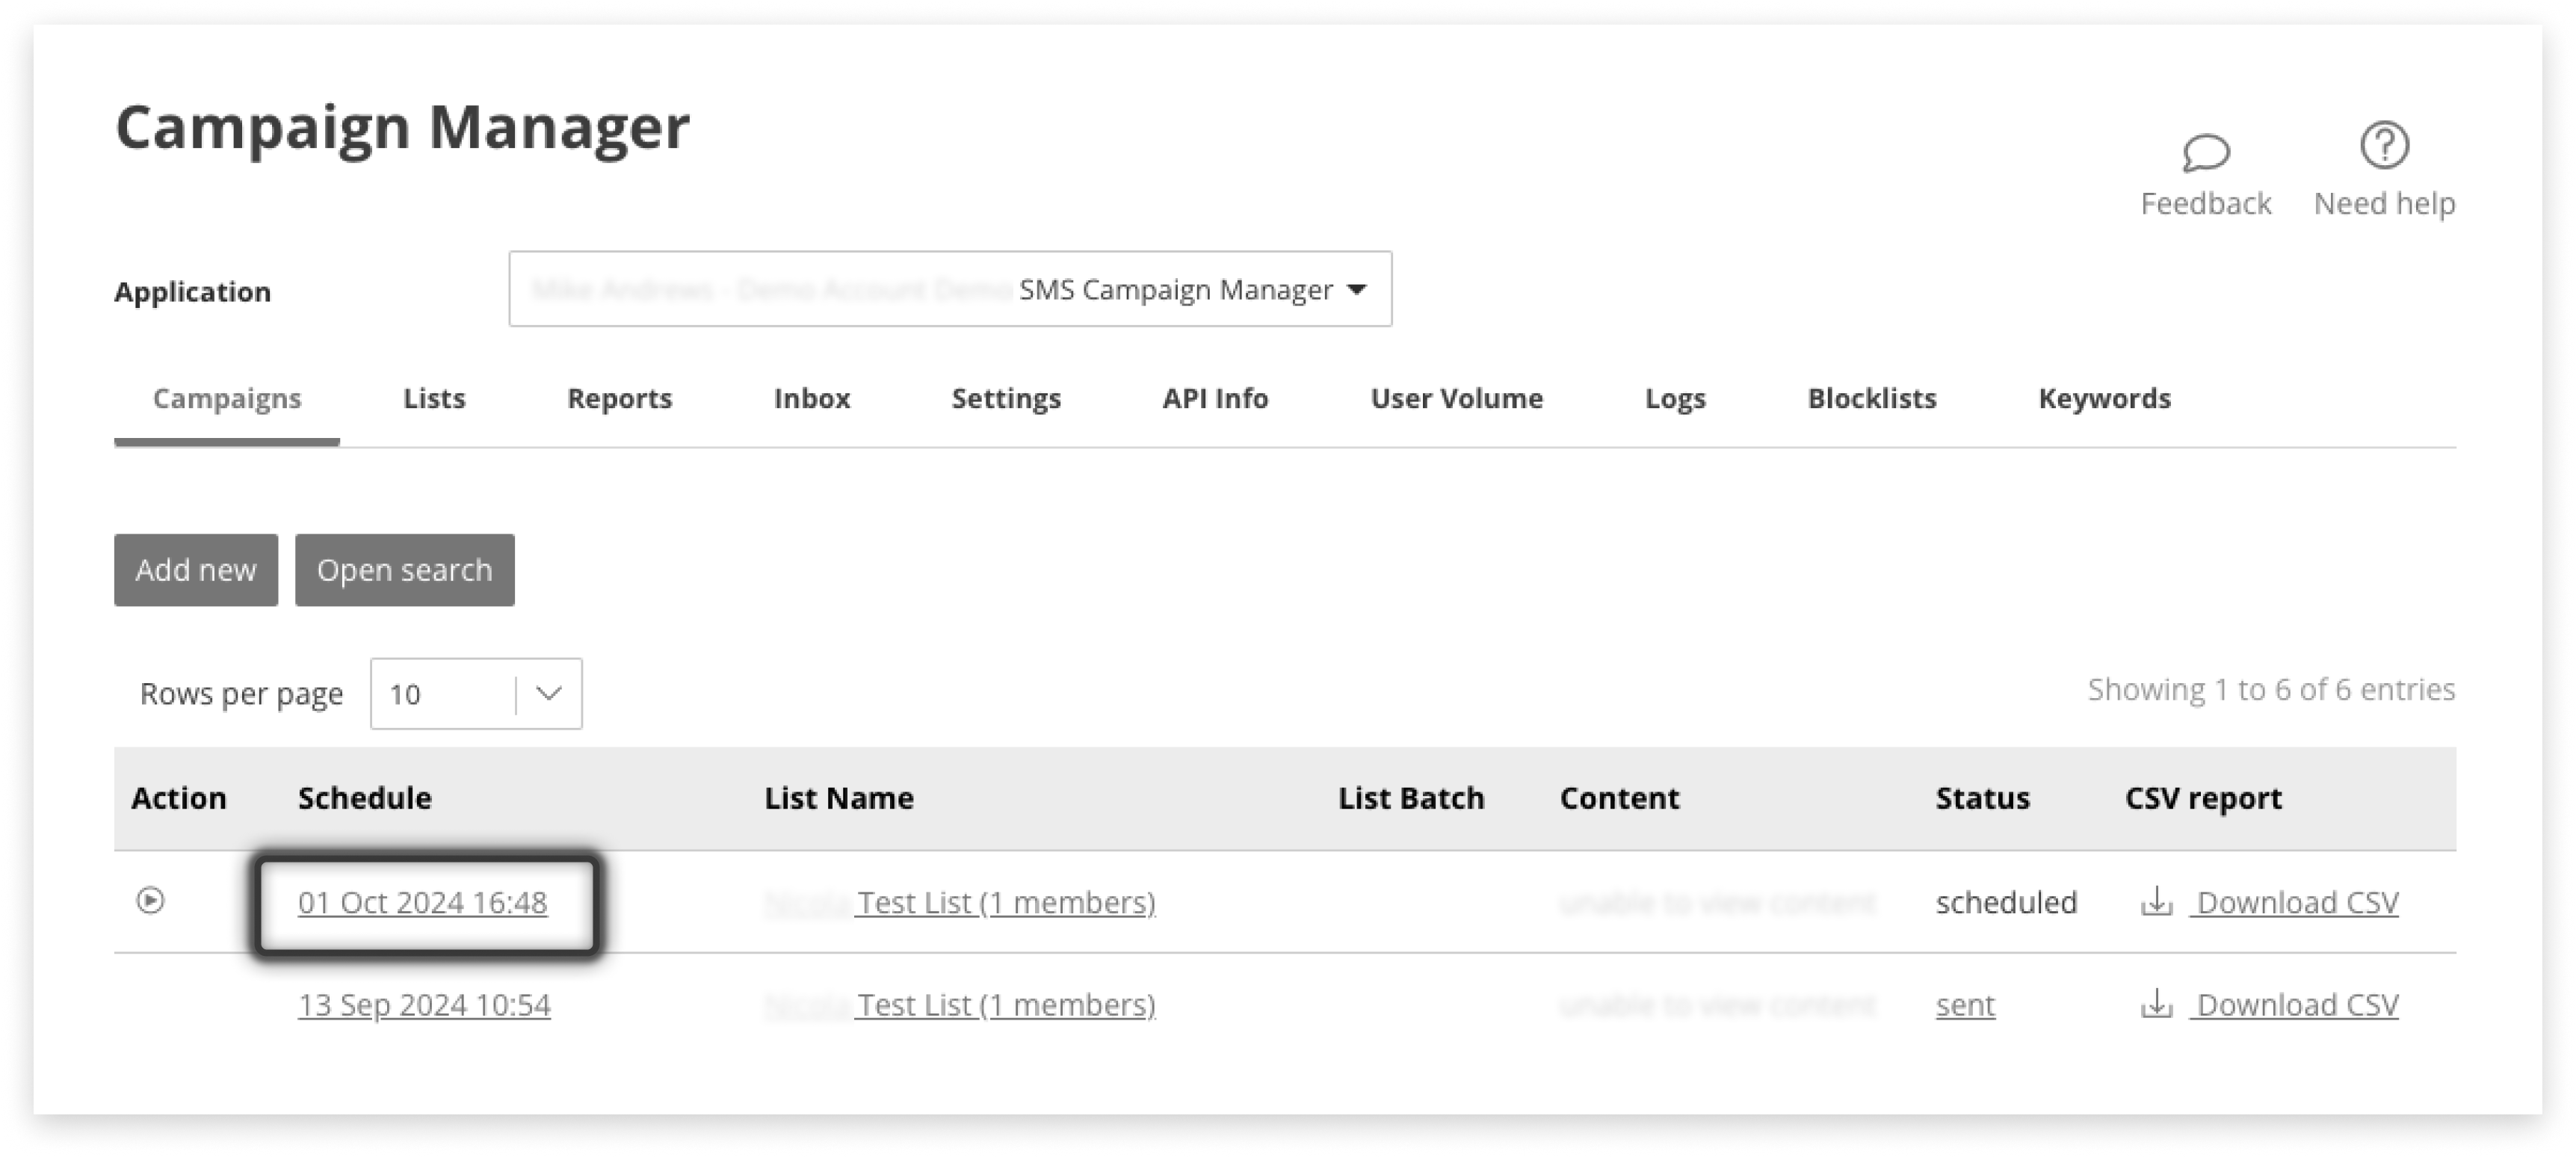
Campaigns: view previous campaigns and send new ones
- On arrival, view past and scheduled campaigns in a table
- Search for previous campaigns by List, message content, status, or batch
- Click Add new to begin crafting a campaign
-
Lists: manage lists of recipients including opt-outs and automatic responses
-
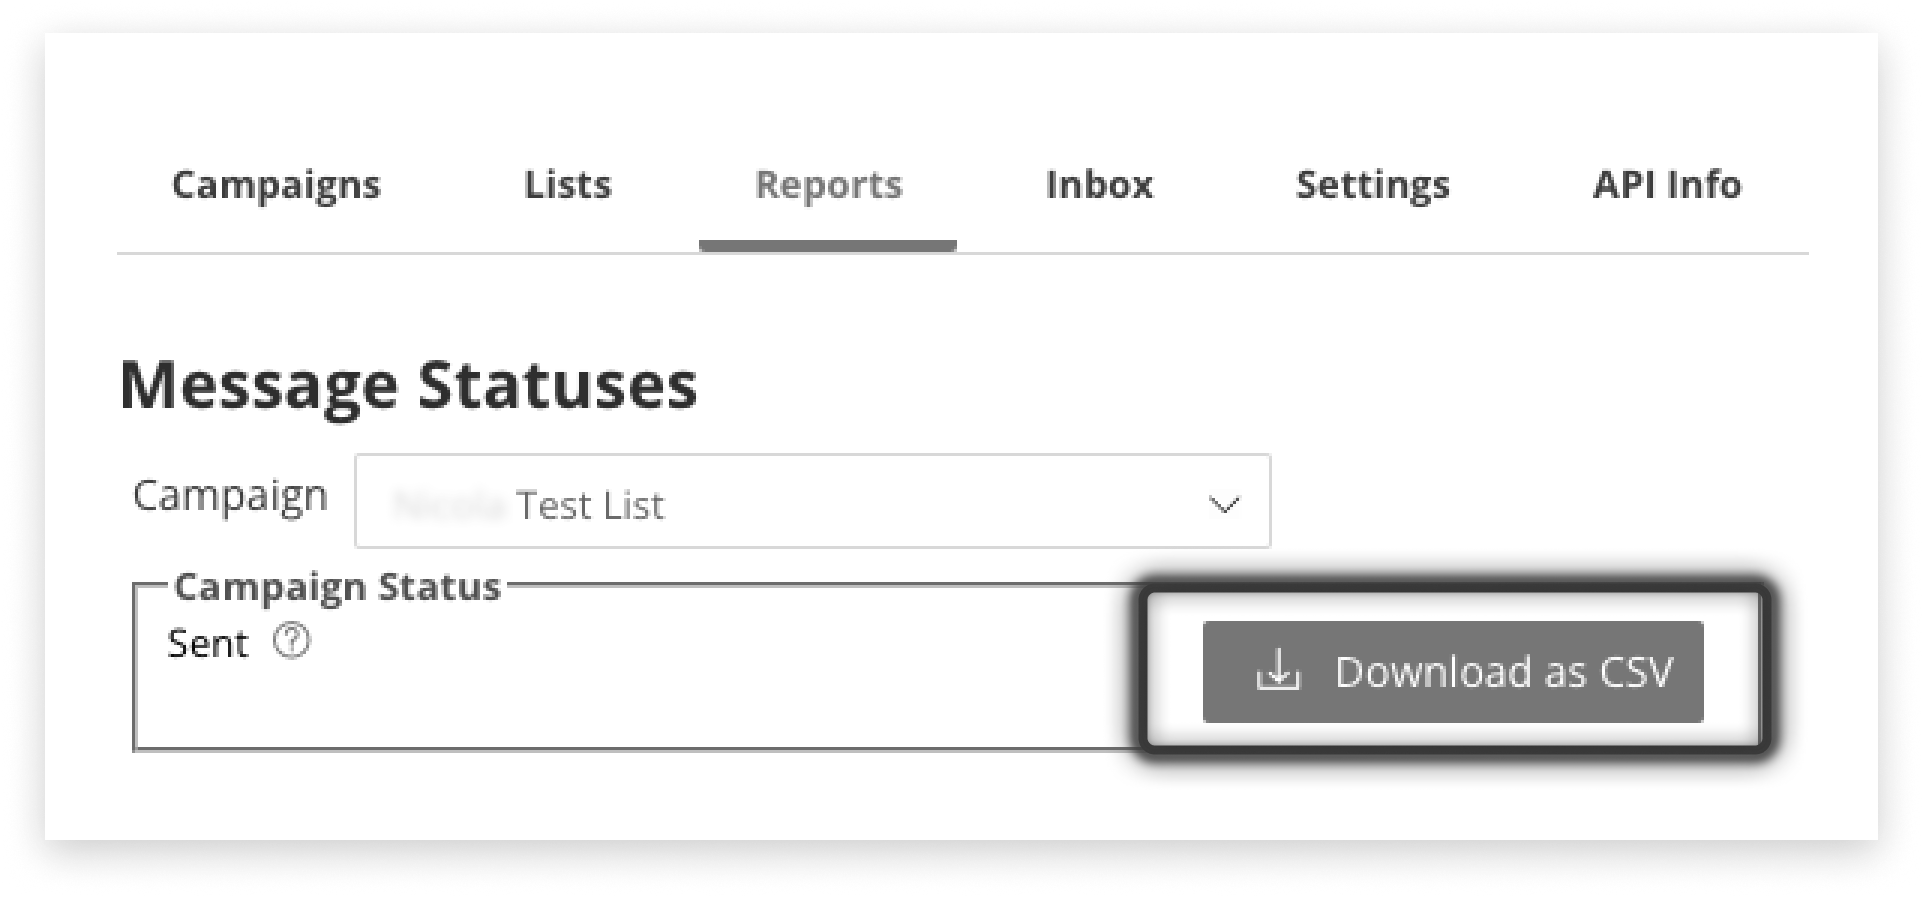
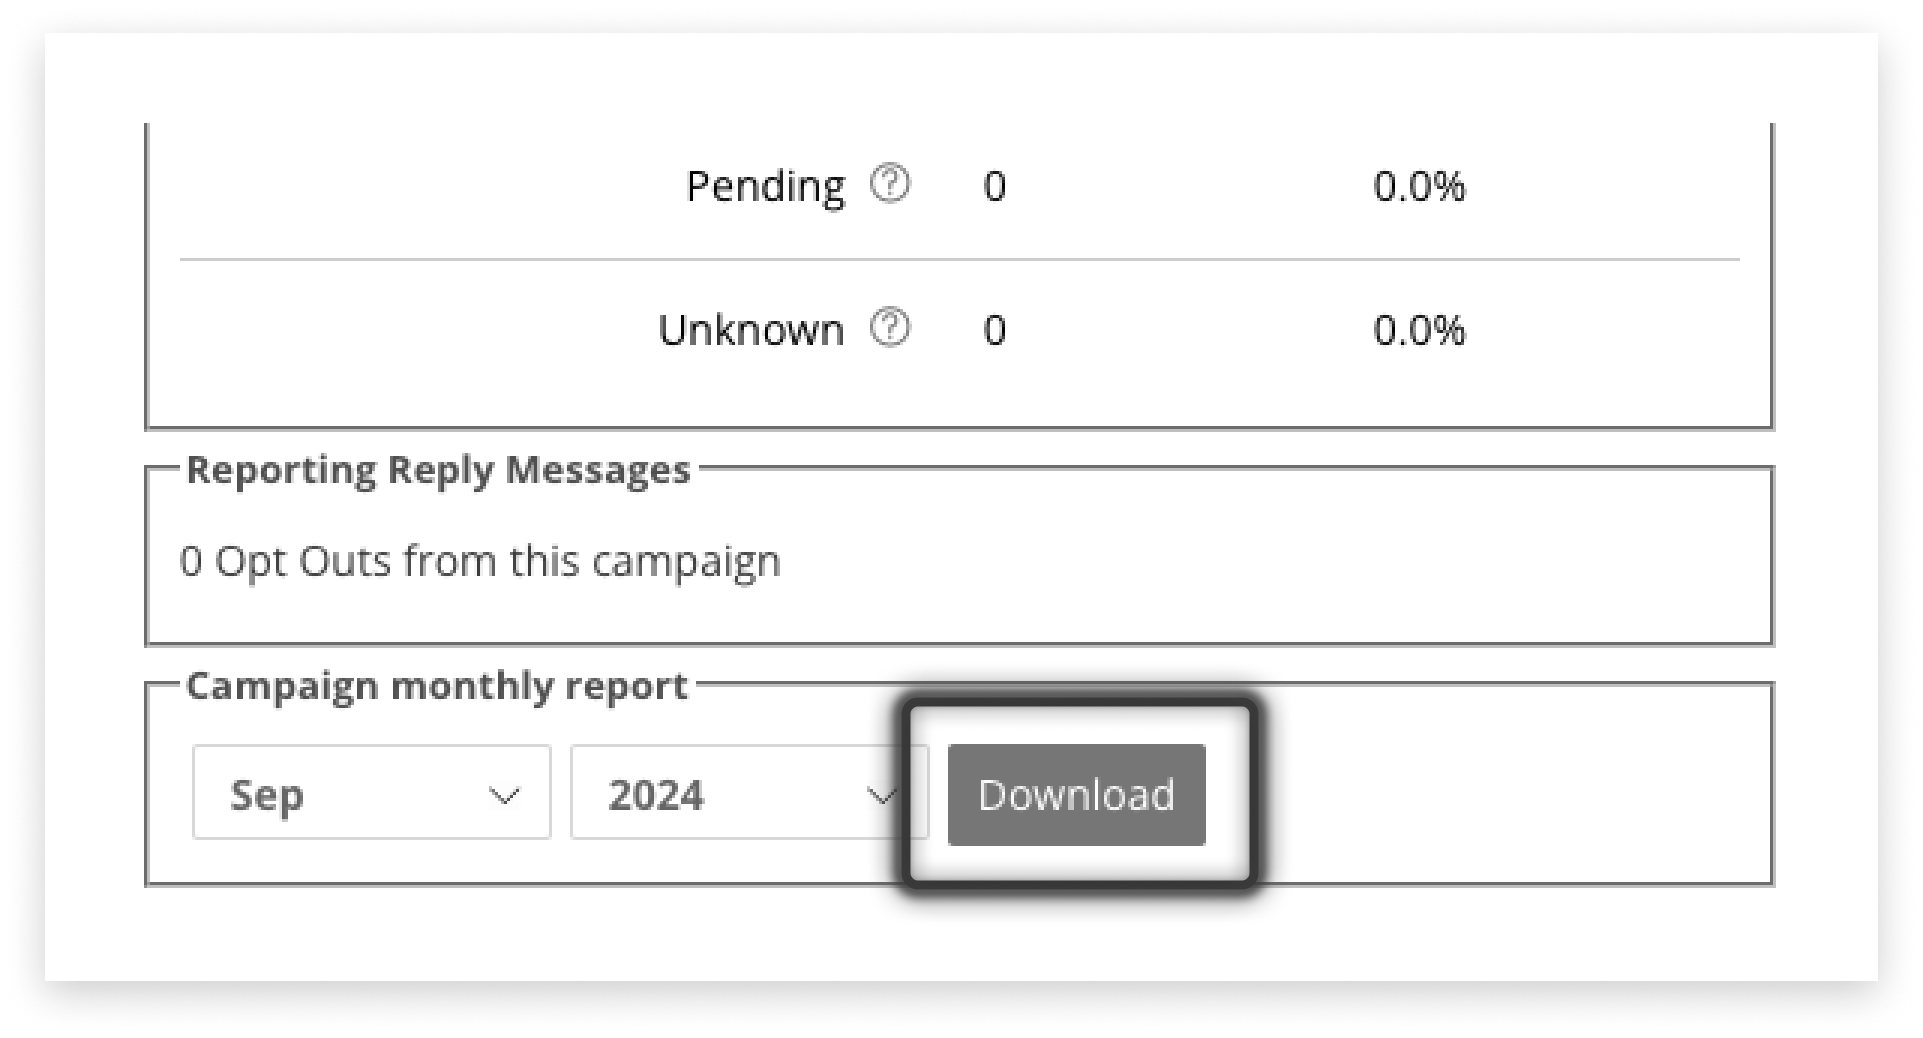
Reports: check on the delivery status of campaigns, total opt-outs by campaign, or message volume by month
-
Inbox: contains replies and responses
-
Settings: configure templates, responses, map prefixes, etc
-
API Info: information for those wanting to connect an API and bring in contact lists before sending
-
User Volume: insight into who is sending messages from your account, and how much
-
Logs: search for user actions such as sending or scheduling, within the account
-
Blocklist: mobile numbers whose opt-out message couldn’t be attributed to a specific list, or are manually assigned here
-
Keywords: set responses to send when people opt-in via the keywords you set, or create workflows with keywords
Basic Settings
The Settings tab in Campaign Manager allows for configuration of templates, automatic responses, sending hours restrictions, opt-out commands, prefix mapping, and email forwarding and callbacks (if activated).

Templates
The section for templates covers configuration in greater detail.
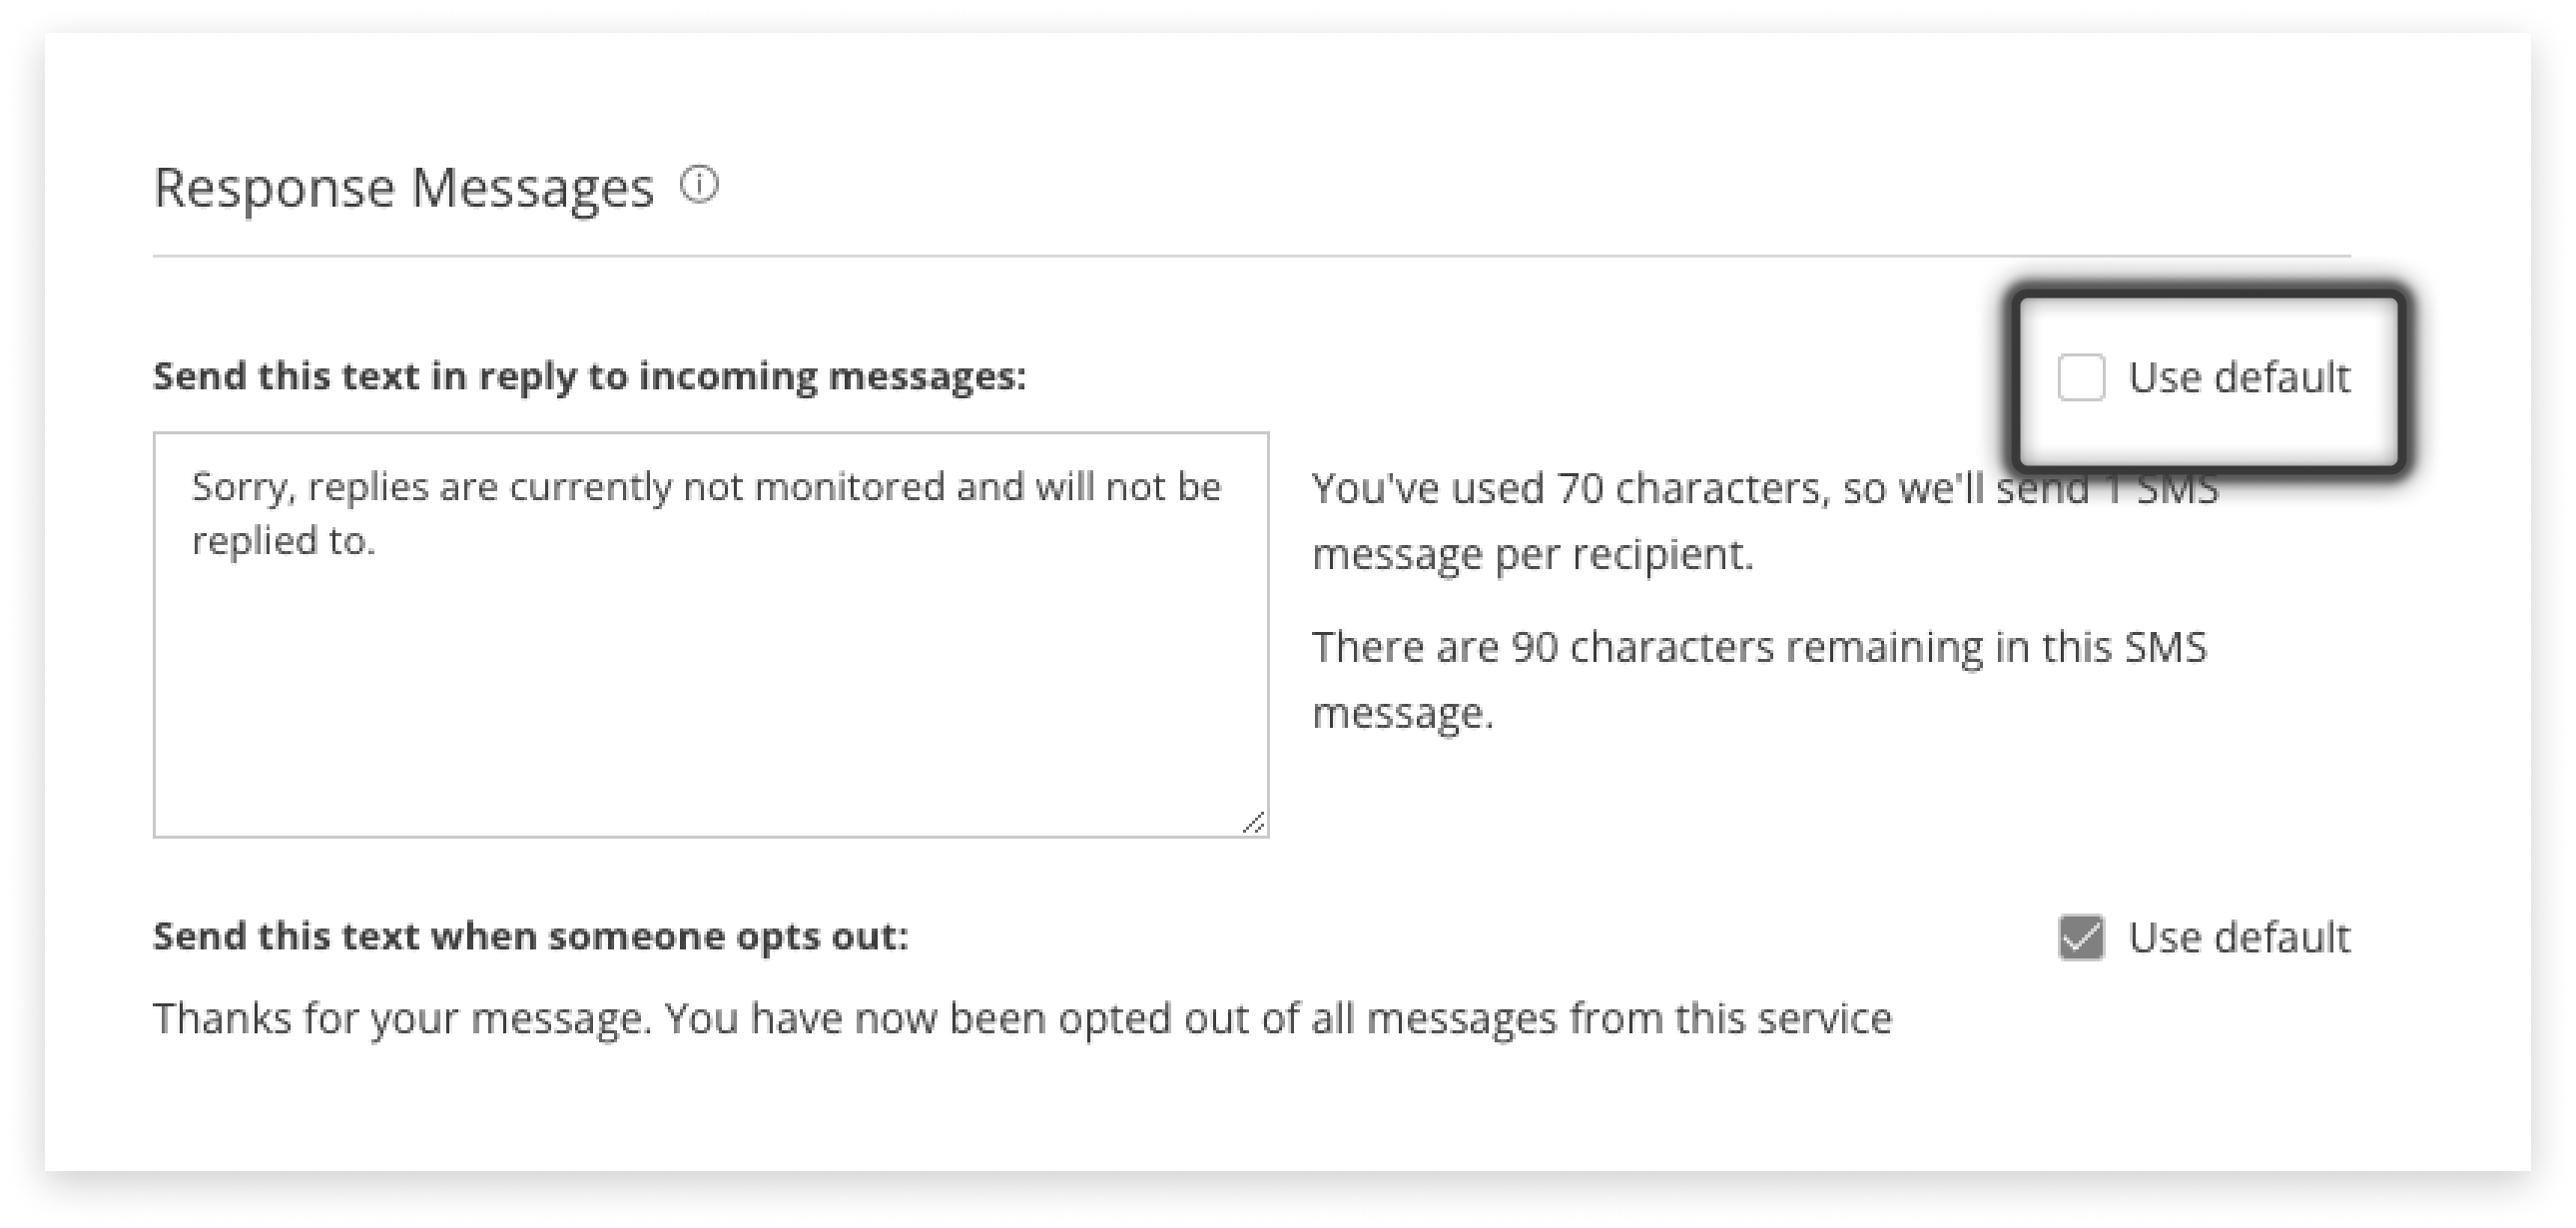
Response Messages
Visit the dedicated section about automatic response messages. Configuring keywords is also covered in detail.
Source Masks
Source masks, also known as Sender IDs, are only available to send into some countries and must be managed via your account Admin (not within this Settings page).
- To add or edit a source mask / Sender ID you must contact your account Admin
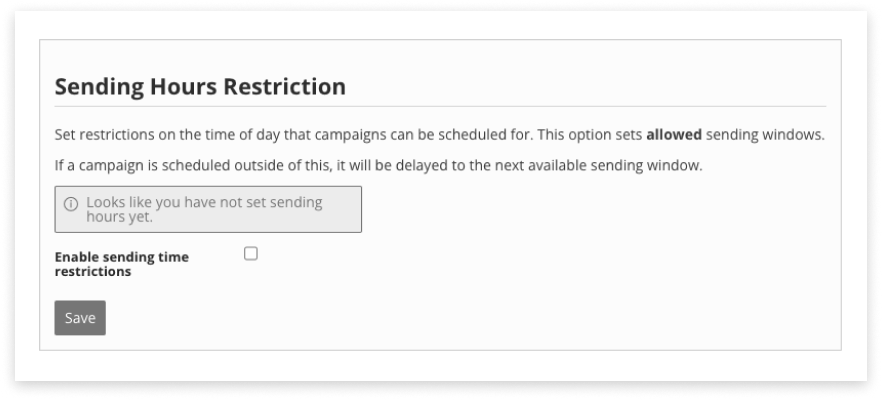
Sending Hours Restrictions
This setting controls the window of time messages are allowed to be sent from you, to recipients.
Sending Hours for Application
Sending Hours for Account
What if both Application and Account Sending Hours are on?
Callback Service
Callback services forward reply messages and delivery receipts to your API, allowing you to receive and process them within your business’s existing suite of tools / software.
Callbacks cannot be configured in the Settings tab; please email the Support Team, who can assist with setup.
How Callbacks Work
Setting Up Callbacks
Reply Callback Service
Delivery Receipt Callback Service
Email Forwarding
It is possible to forward replies to your campaigns on to an email address that has been configured for our Email2SMS application.
This is available by request; please contact your Admin.
Once set up, allowed emails will be available for selection in the dropdown.
Select an email address, and Save.
Opt-Out Commands
Learn about Opt-Out commands in greater detail here.
Prefix Maps
Messages are sent via international phone number format (+64xxx…)
This setting allows you to import or create recipient phone numbers that may not be international format, and have them automatically converted to international format at the point of sending.
Below are some suggested combinations to load, based on the country SMS will be delivered to:
| Country | Original Prefix | Cleaned Prefix |
|---|---|---|
| Australia | 04 | +614 |
| Australia | 614 | +614 |
| Australia | 6104 | +614 |
| New Zealand | 02 | +642 |
| New Zealand | 642 | +642 |
| New Zealand | 6402 | +642 |
| Indonesia | 02 | +628 |
| Indonesia | 028 | +628 |
| Indonesia | 0208 | +628 |
| Singapore | 05 | +65 |
| UK | 447 | +447 |
| UK | 0447 | +447 |
| UK | 07 | +447 |
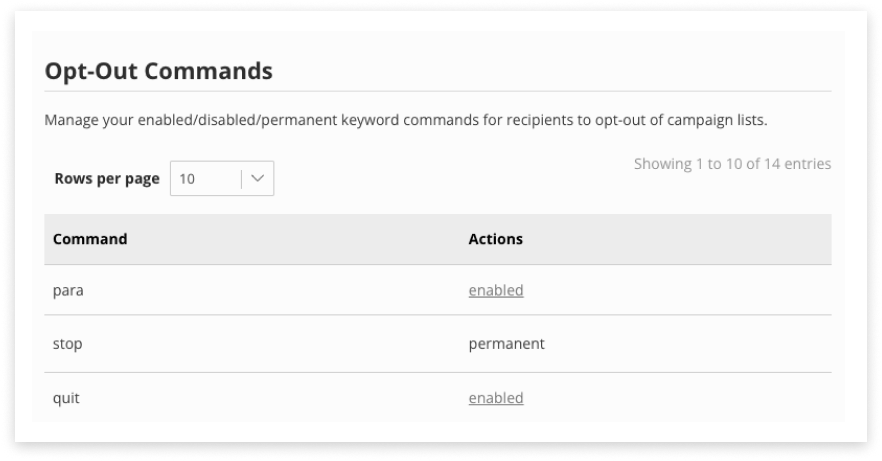
Opt-Outs
It must always be possible to opt out from any campaign.
Because of this, the reply “STOP” is permanently enabled in response to any campaigns sent out to a List.
Opt-Out Commands
There are a pre-set list of common opt-out terms that can be enabled for your Campaign Manager:
- Navigate to the Settings tab of Campaign Manager
- Scroll down to the section titled Opt-Out Commands
- If a term says “enabled’ then it will trigger an opt-out
- To enable a ‘disabled’ term, click the word ‘disabled’
Responses to Opt-Outs
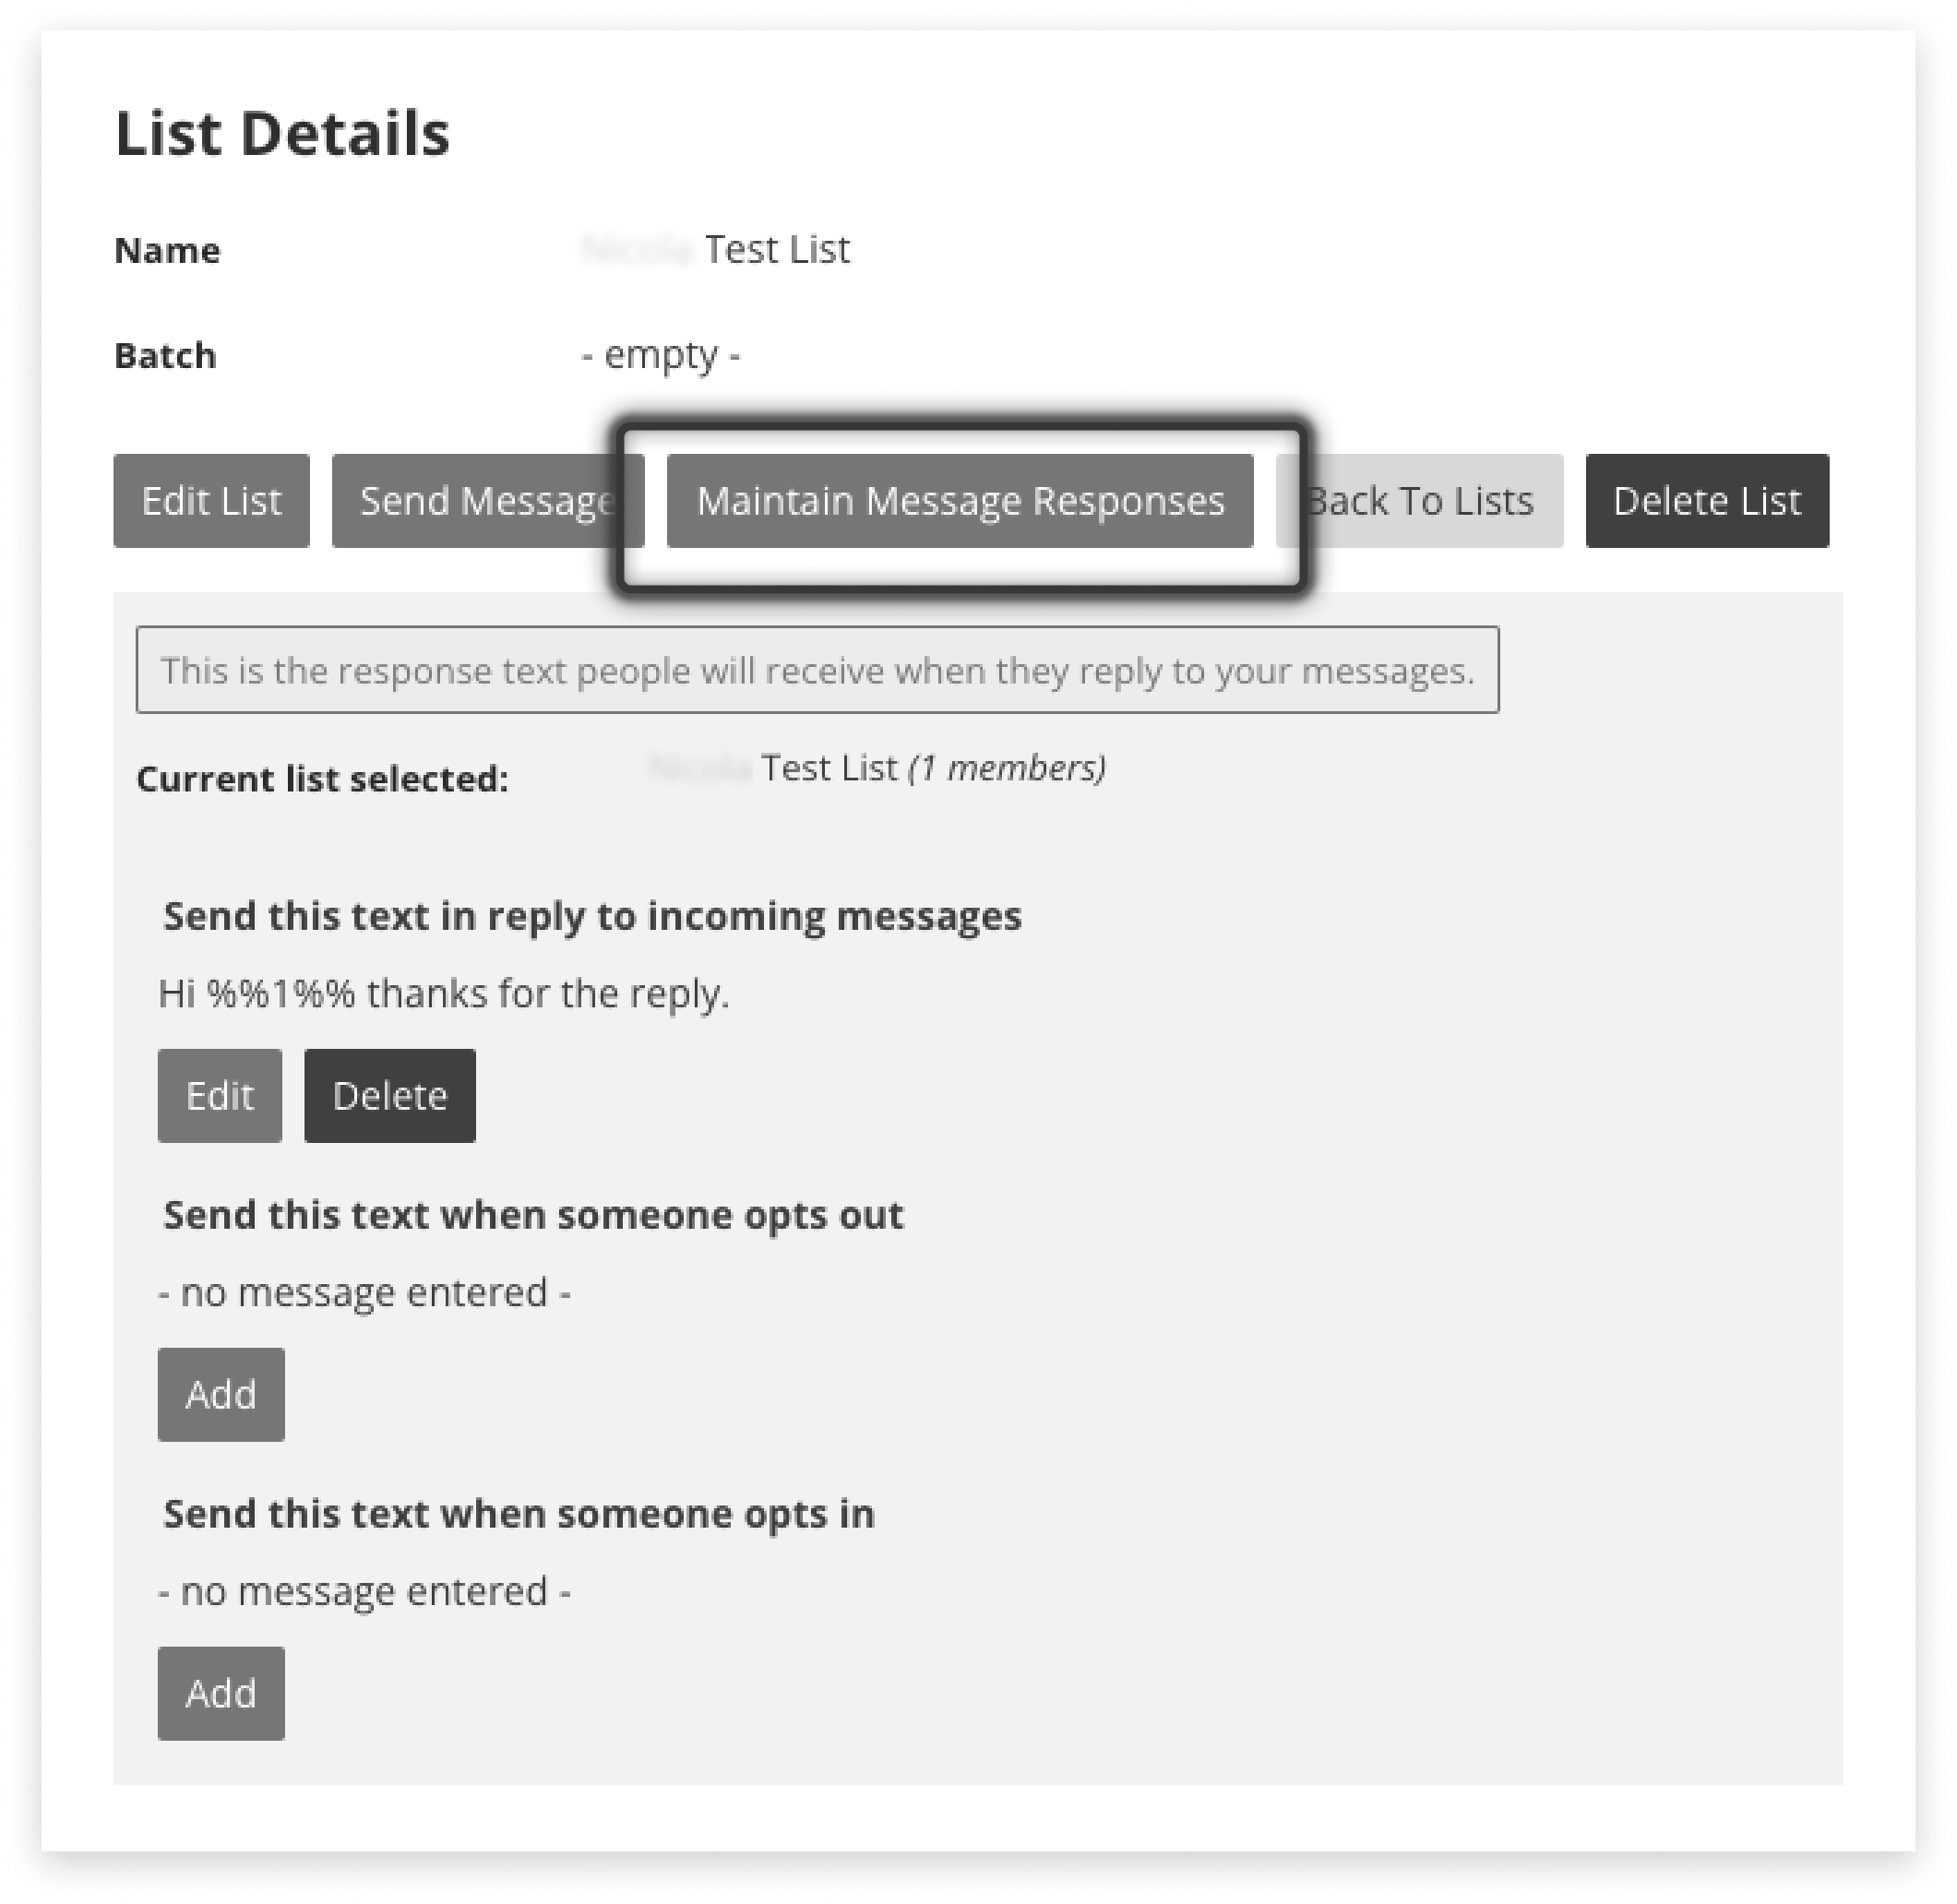
There are three locations in Campaign Manager to set automatic responses incoming messages:
- Default responses in the Settings tab
- List responses inside a List in the Lists tab. These will override Default responses, if set
- Campaign response - when you create a Campaign for a new List. These will override Default responses, if set
If List-level or Campaign-level responses are set, then they will be sent in response to a reply.
The Default response will be sent out if neither Campaign or List-level responses are set.
See below for locations to create opt-out responses:
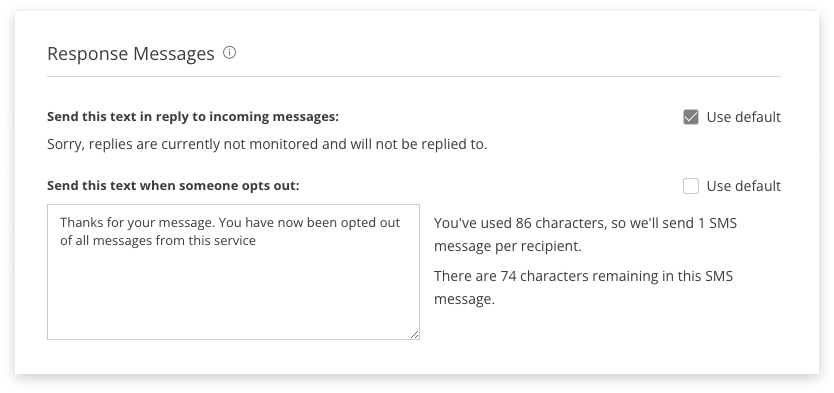
Opt-Out Default Response

Opt-Out List Response
Opt-Out Campaign Response
Check Your Opt-Outs
Download a list from the Lists tab, and review the Opt-Outs column in the CSV.
Manually Opt-Out
If you receive a request to opt a number/recipient out of communication by another channel then you may have to manually opt-out a number:
-
Navigate to the List in question
-
Find the Mobile to opt-out
-
Under the ‘Actions’ column in the table, there should be a clickable link that says ‘Opt-Out’ (if not, then they are already opted out)
-
Click ‘Opt out’
-
Confirm wanting to opt out
-
This Mobile will now appear in the Blocklist
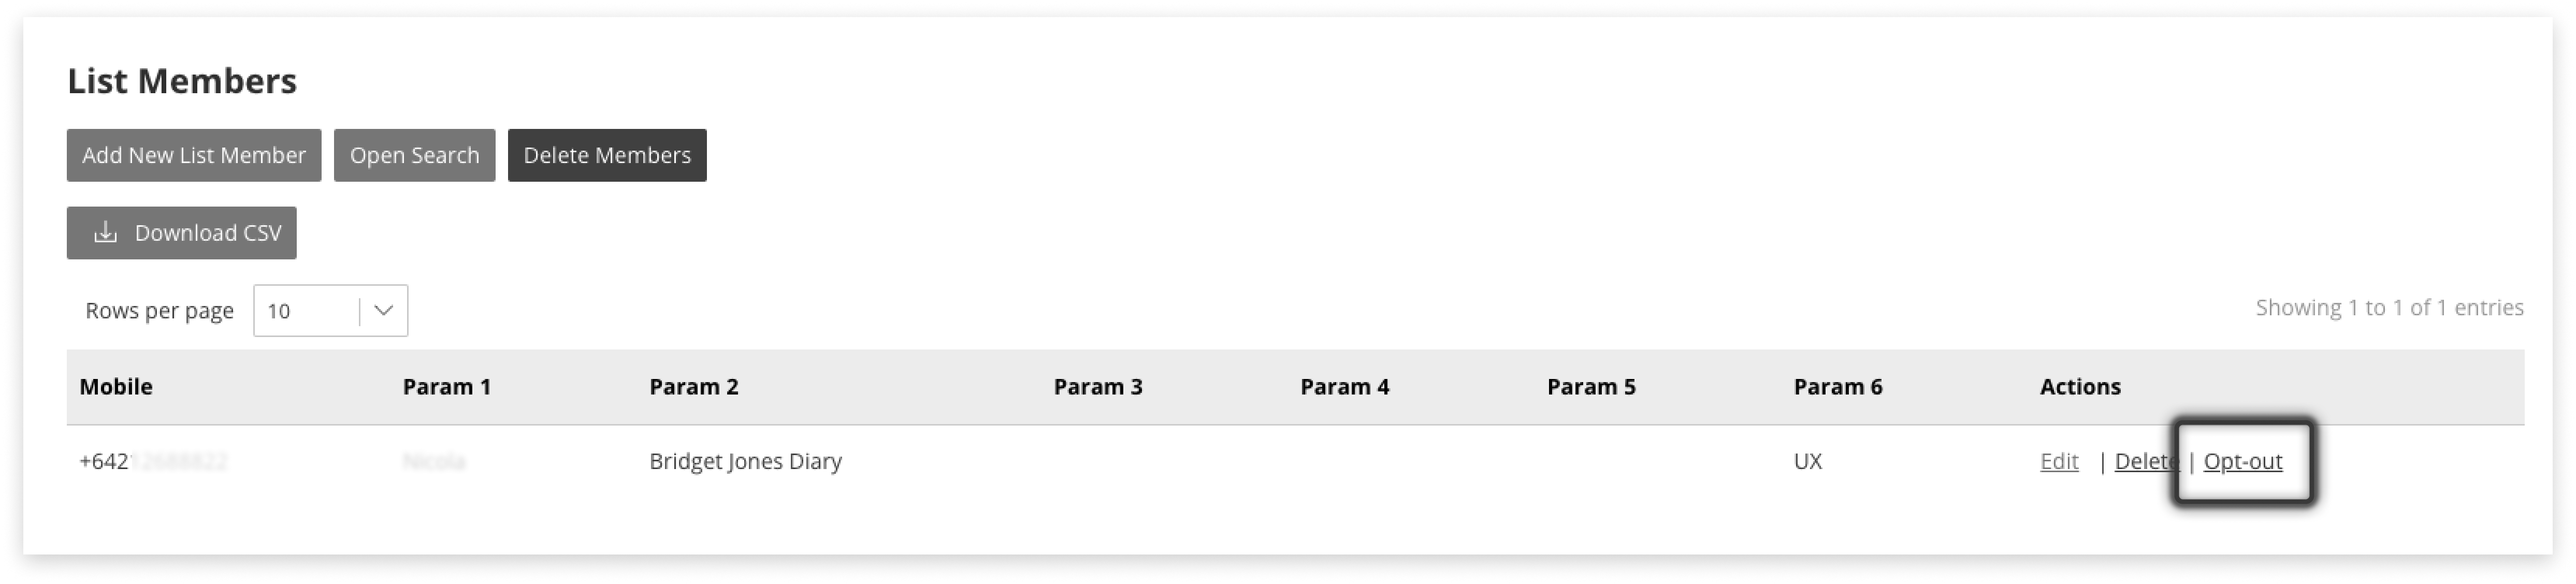
The opted-out mobile will remain in the List. Notice the mobile is now in italics and there is no option to opt them out (as they already are opted out).
If a mobile number was manually opted-out from a List to the Blocklist, and is then deleted from the Blocklist it will reappear in the List with the ability to opt-out re-enabled.
Blocklist
Numbers enter the Blocklist when an opt-out reply cannot be associated with a specific list. For example:
- A message to opt-out comes in after a campaign has closed
- A message in reply to a masked mobile number
If a mobile number has been manually moved into the Blocklist from a List, it will also remain displayed in the List in italics.
Numbers should be loaded into the Blocklist as a single-column CSV file and in the correct international format (+64xxxxx…)
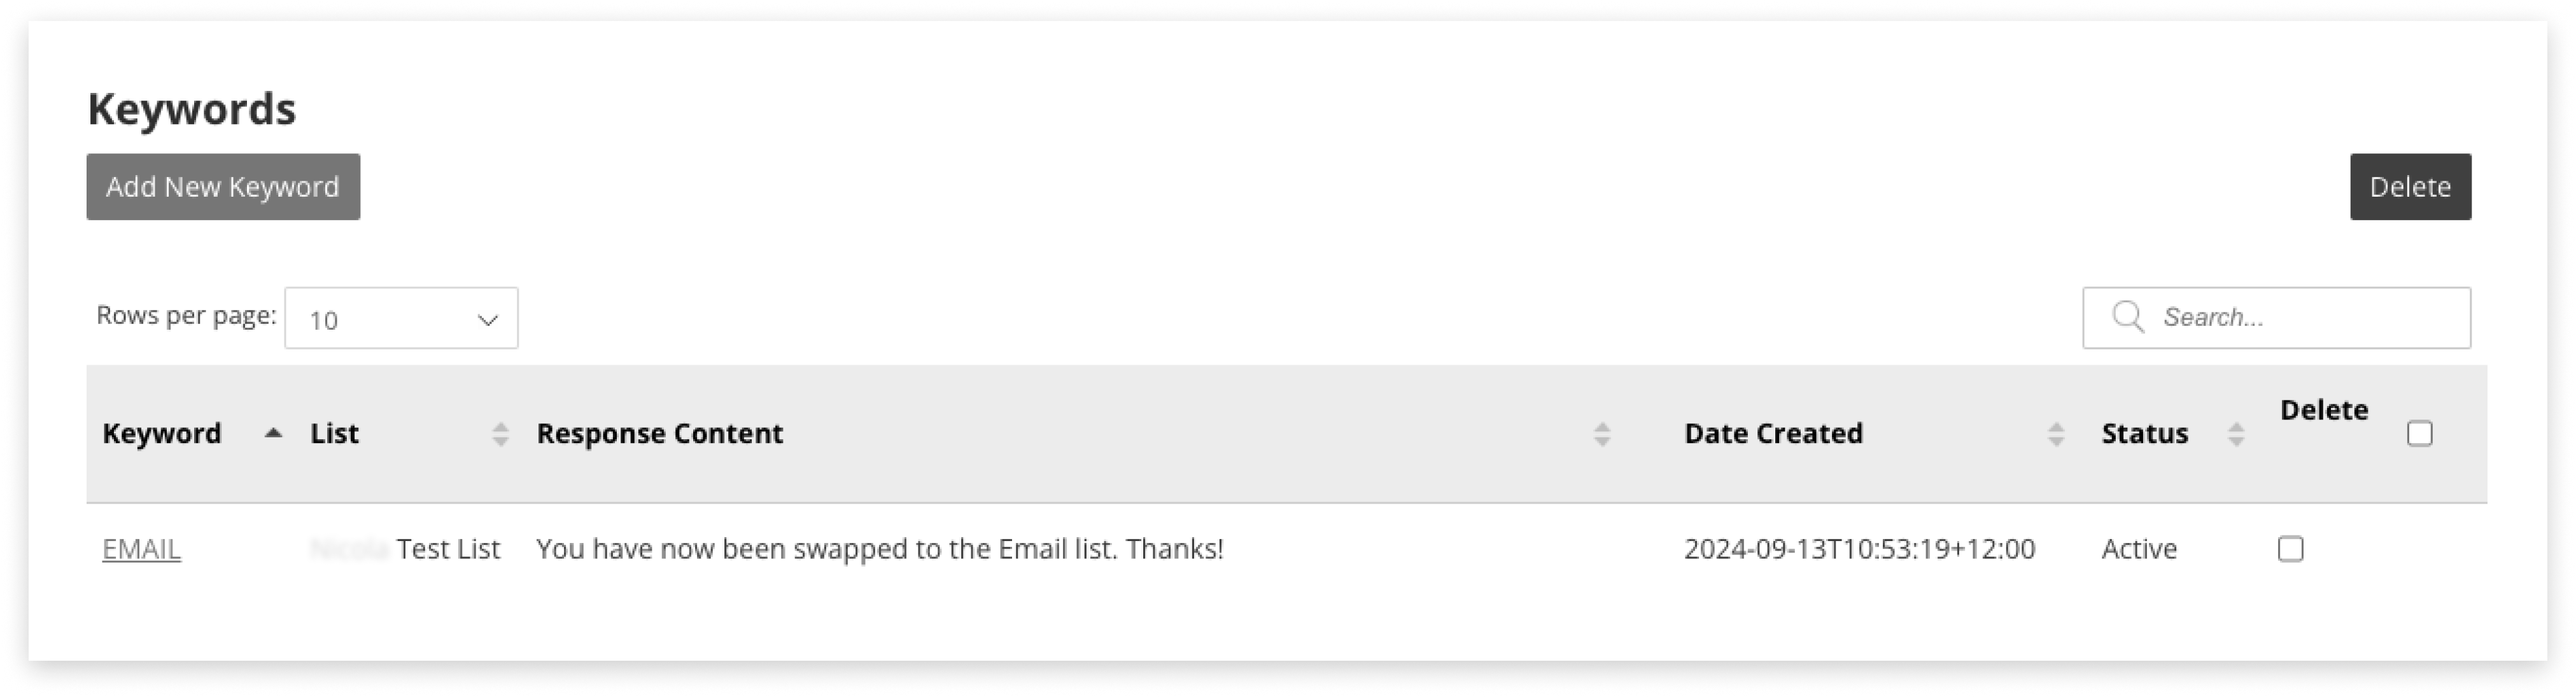
Keywords
Keywords can be used for opt-in, or as a workflow builder.
Adding a New Keyword
-
Ensure the List of recipients for these keywords is set up. This could either be an empty, named, list - or a full one
-
Navigate to the Keywords tab in Campaign Manager
-
Click the ‘Add New Keyword’ button
-
Type the keyword for people to reply with, e.g. YES or SAFE - don’t include any spaces
-
Select the List which the person will be added to, when they reply with the keyword
-
Write the message Response content that will be sent back to the person. This is optional because:
-
If you enter a message for this keyword, that’s what will be sent
-
Leave this blank for the default automated response to be sent in reply. This can be configured in the Settings tab.
-
-
Click ‘Save’
Rules for Keywords
Some rules for creating successful keywords:
-
Keywords should be a single word or words without a space, e.g. SUBSCRIBE or DISCOUNT_100
-
The same keyword cannot be used by more than one List
-
If a keyword is deleted, it cannot be re-added or used in another list
Editing or Deleting
To edit a keyword, click its link under the left-hand column ‘Keywords’ on the table. Make changes, and save.
To delete, tick the checkbox on the row of the Keyword to delete. Click the red Delete button, and confirm.
Building a Workflow
We suggest mapping out your response-tree before starting to load up keywords and responses. Here is an example for Business Continuity Planning (BCP) in the workplace:
| Original SMS | - | - | - | - |
|---|---|---|---|---|
| Are you safe? Reply SAFE or UNSAFE | - | - | - | - |
| Keywords —> | SAFE | UNSAFE | - | - |
| - | Glad to hear it. Are you up for working tomorrow? Reply TIMEOFF if not. Otherwise - where will you work for the next few days? Reply HOME or OFFICE. | Call 111 for emergency assistance. Do not worry about work; get yourself and family to safety first. | - | - |
| Keywords —> | HOME | - | OFFICE | TIMEOFF |
| - | Do you have everything you need? Reply SORTED if you are all set up, or ASSIST for us to call you back. | - | Great, glad everything is fine - looking forward to seeing you there. | We understand, it’s been a stressful time! We will sort out the leave balance when you’re back. Feel better soon! |
| Keywords —> | SORTED | ASSIST | - | - |
| - | Great, glad everything is fine - see you online tomorrow. | No worries - someone will call today to help. | - | - |
API Info
Campaign Manager has a REST API available to bring in List information, message templates, or reports from your own software suite, reducing manual workload.
The Mobile Gateway REST API provides access to resources (data entities) via URI paths. To use this API, your application will make an HTTP request and parse the response. The response format is JSON.
Capabilities
Campaign Manager API supports:
- Creating a new list then sending to that list via the Campaign Manager UI
- Creating a new list and sending immediately using the API
- Creating a new list and scheduling using the API
Data that can be sent through via API:
- Name
- Schedule
- Content
- Template
- Mask / Source mask / Sender ID
- Batch
- Email (should end with E2S email domain)
- Reply-response
- Opt-out response
- List members [number + 6 params]
- Remove-opt-outs (true)
- Strict validation (true)
- Delete multiple lists
CM API also allows users to extract:
- Existing lists (including mobiles and up to 6 parameters)
- Existing templates
- Campaign reports
CM API does not support:
- Sending or scheduling to existing lists
- Creating templates
API Documentation
API documentation is available here for:
Creating a Campaign
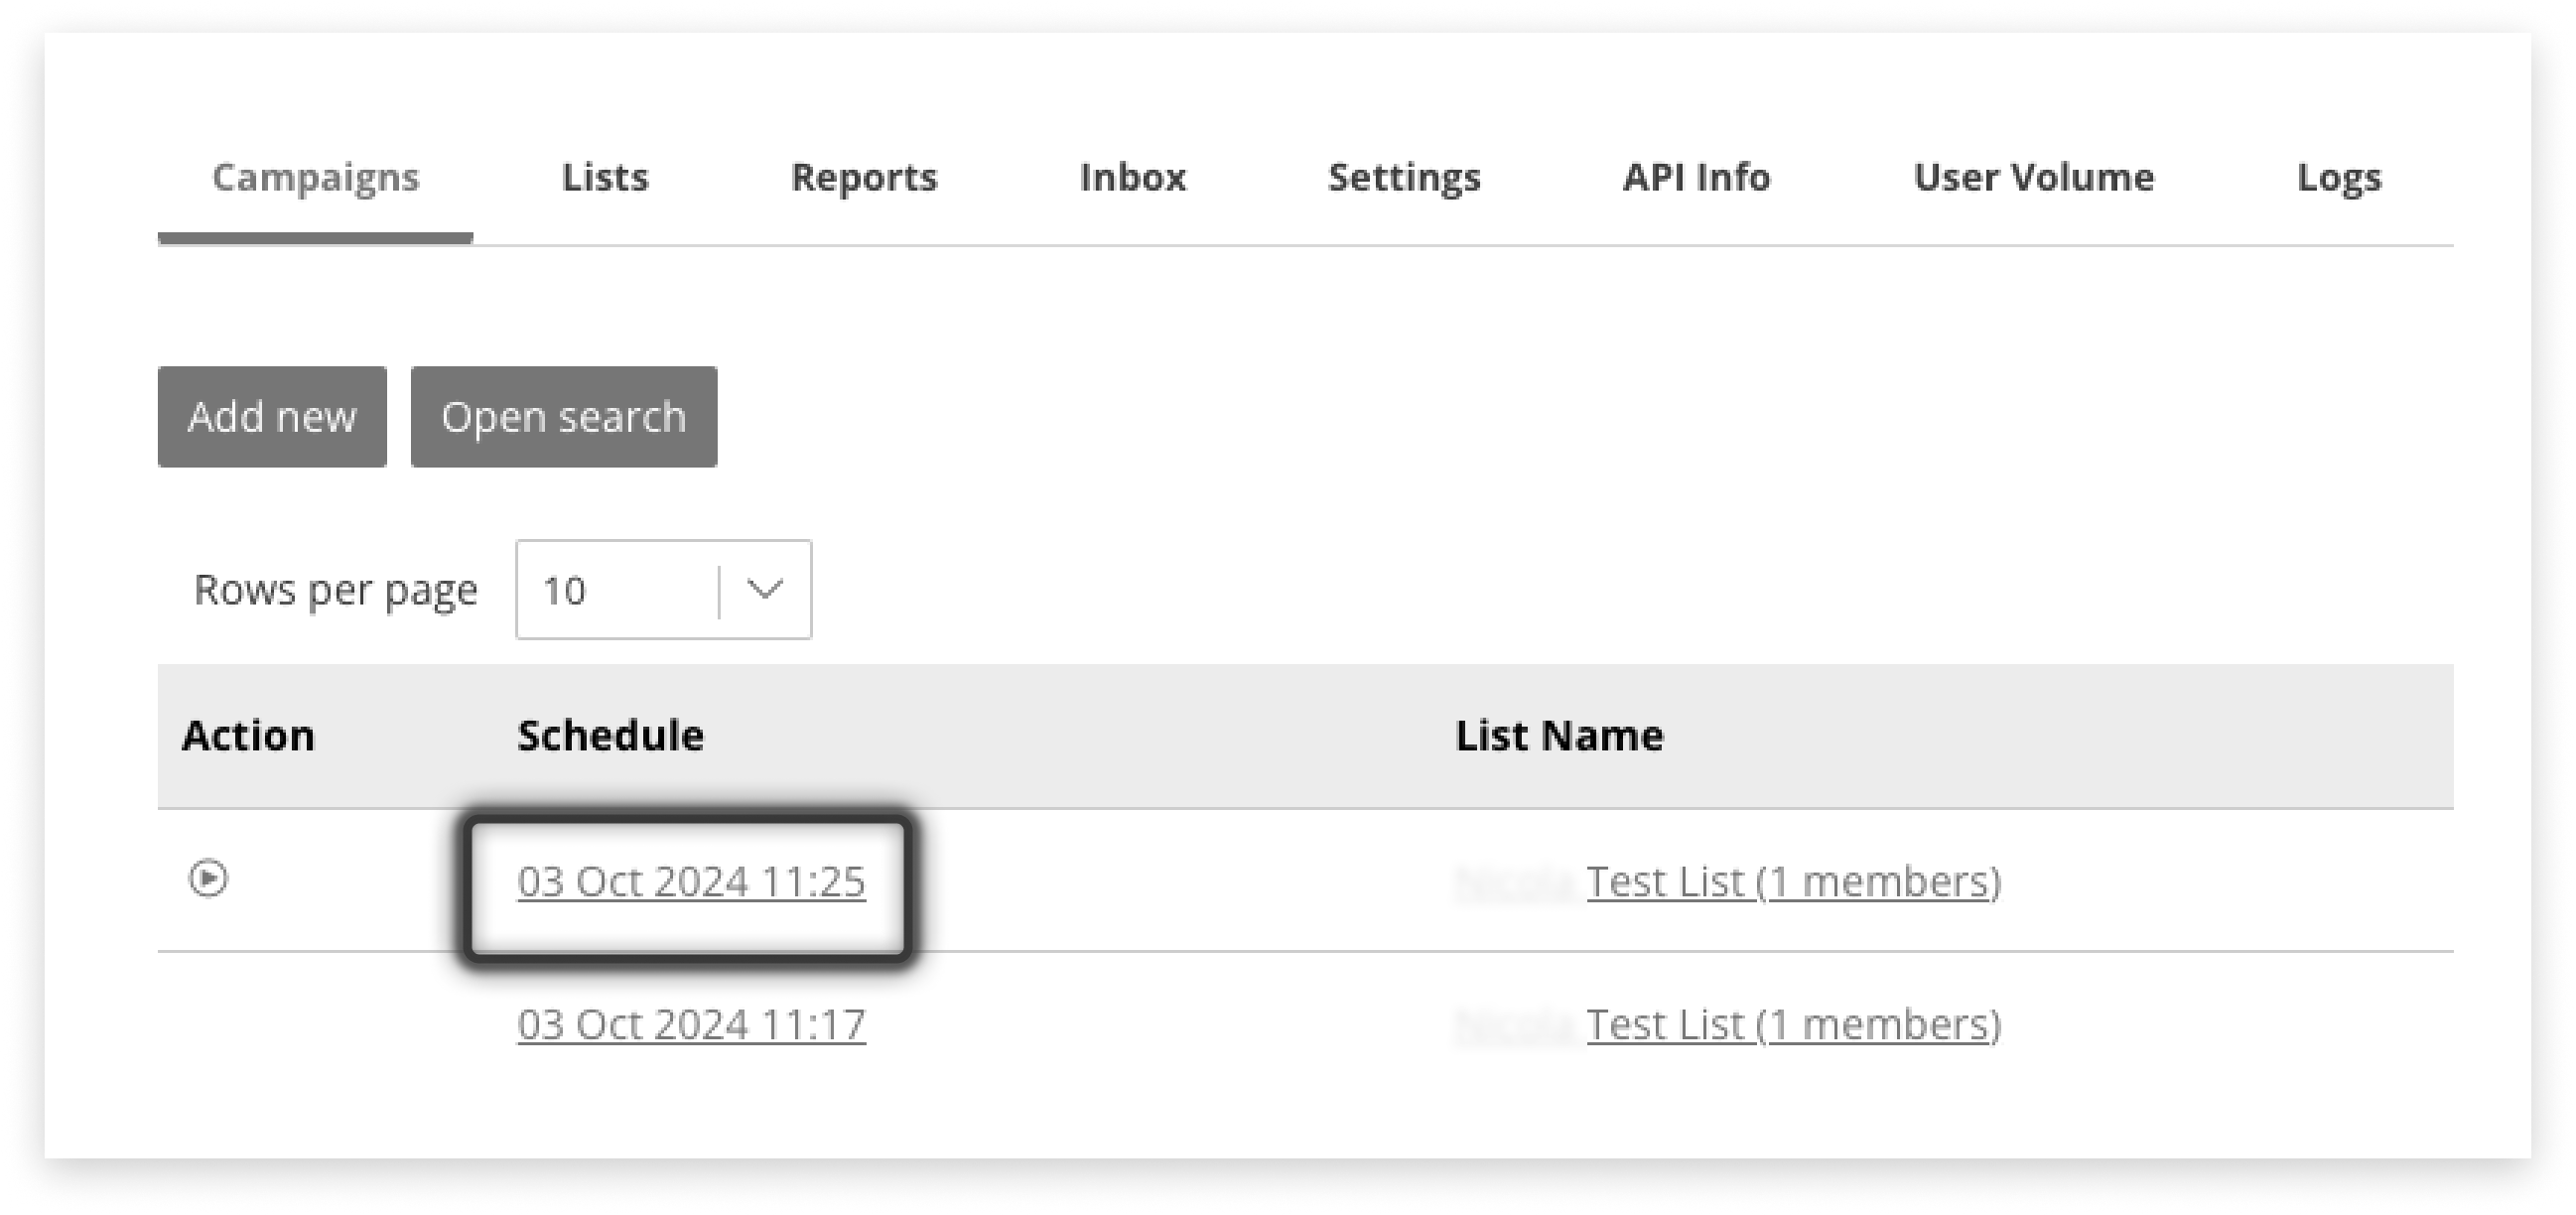
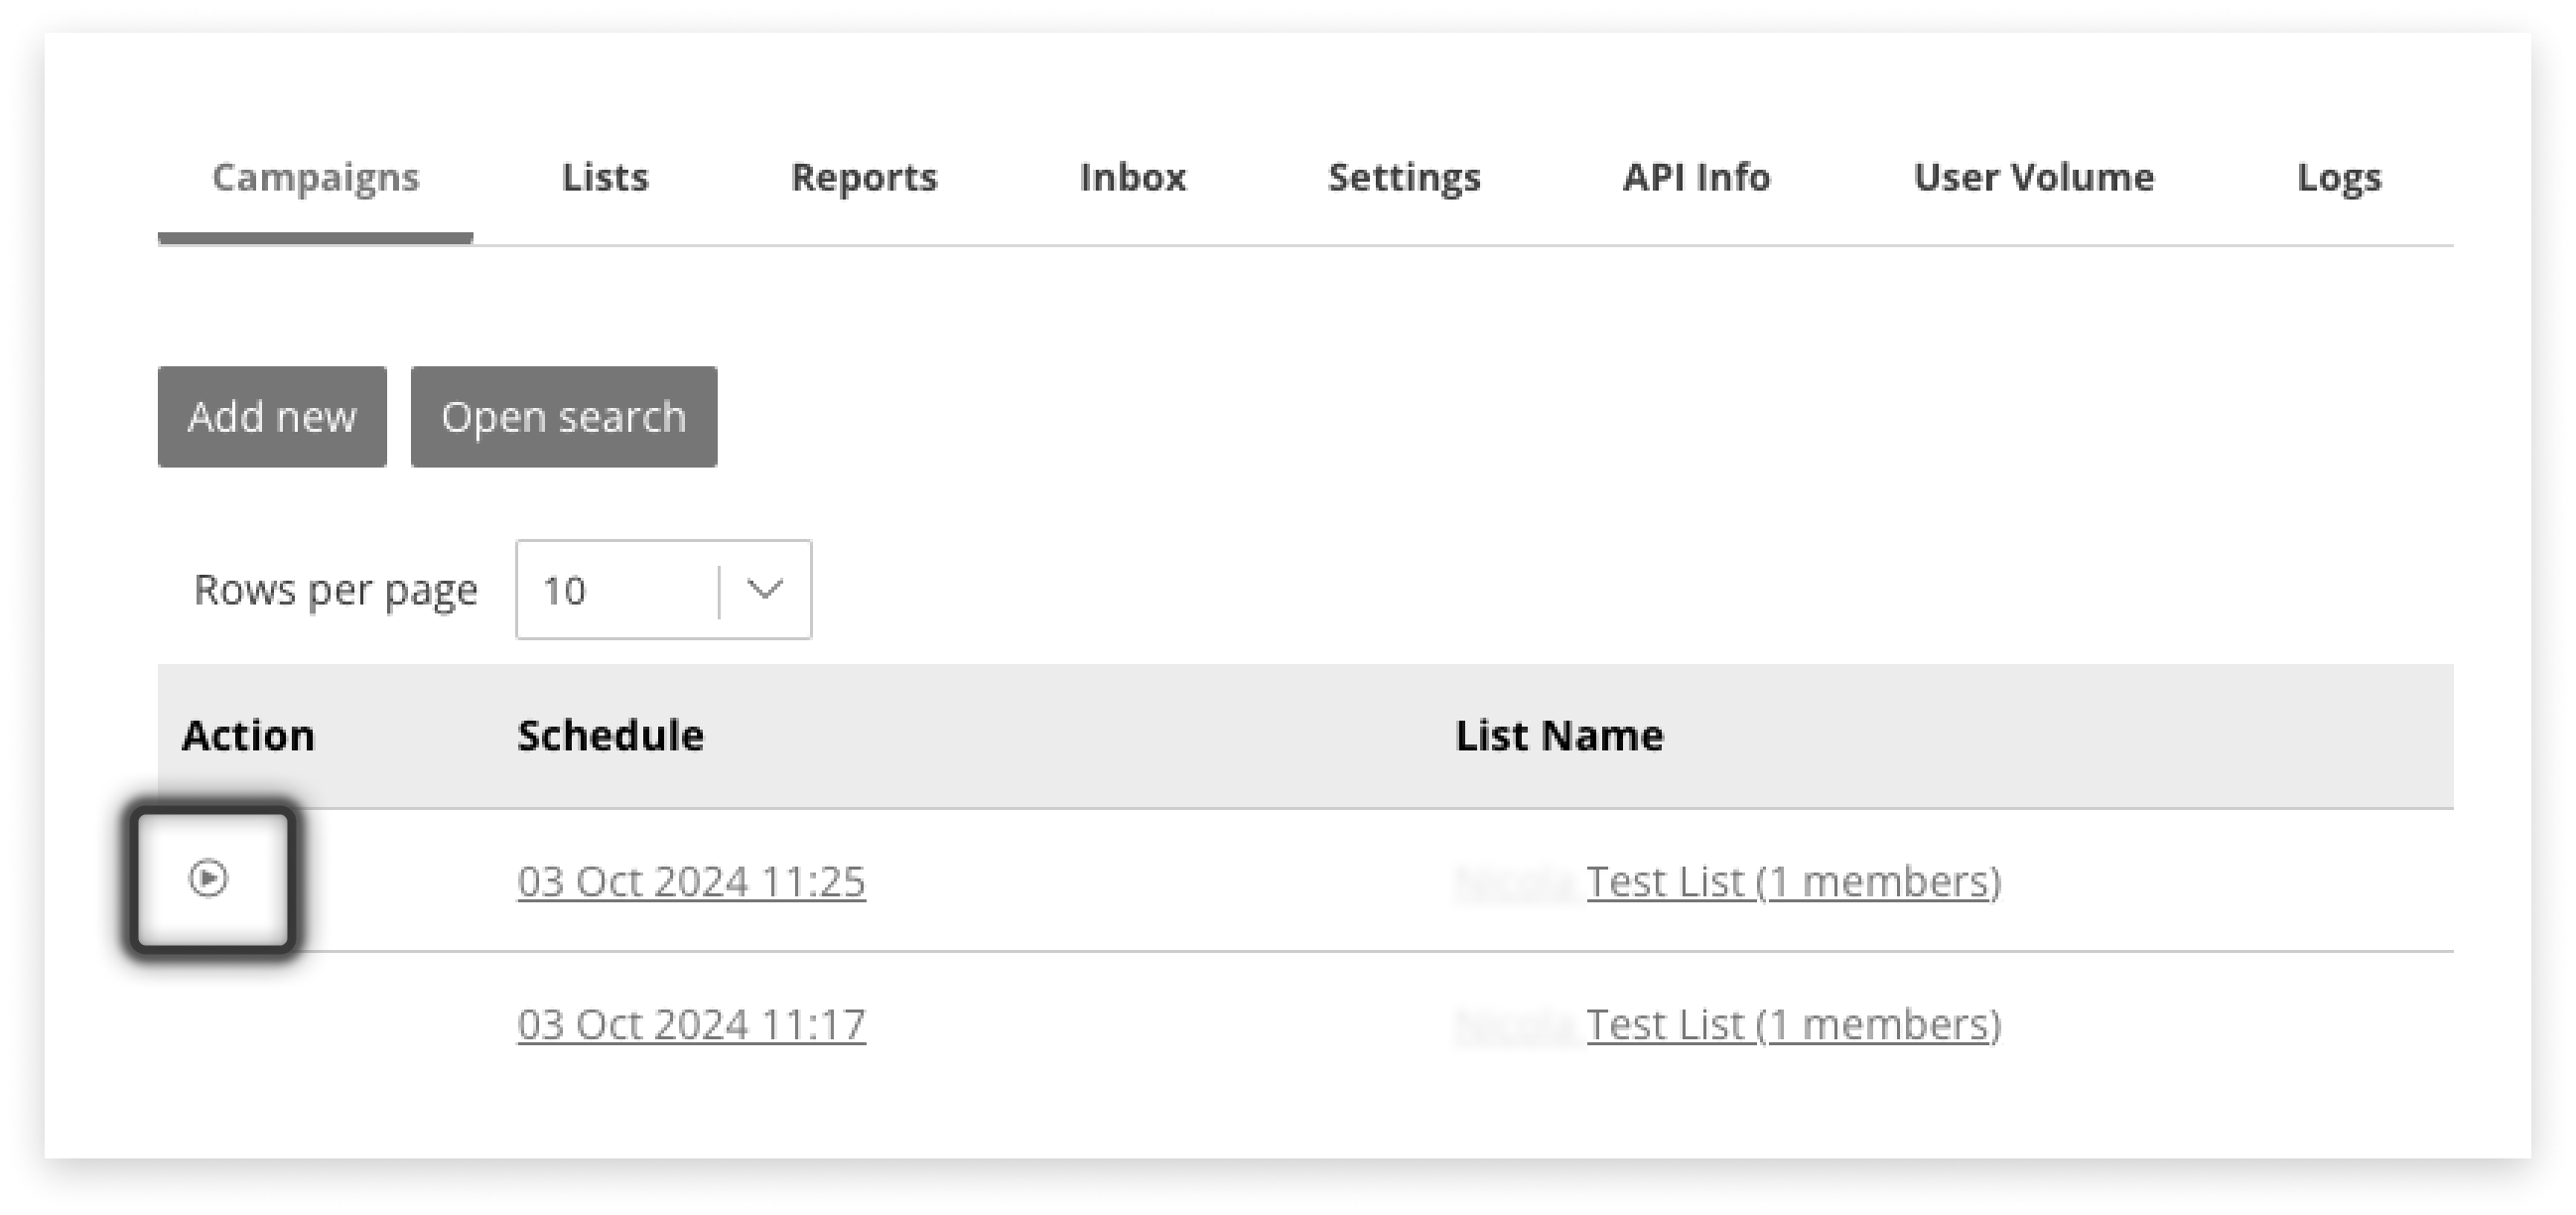
Campaigns can be sent to tens of thousands of people at one time! There are a few common steps every time a campaign is sent:
-
Navigate to the Campaigns tab inside Campaign Manager
-
Click ‘Add New’ to access the Create Campaign page
-
Select whether to upload a new list or use an existing list
-
Select a template, or choose to type a message
-
If using a template, it is possible to edit the message now
-
Select whether to send now, or schedule it for later
-
Click to confirm your choice

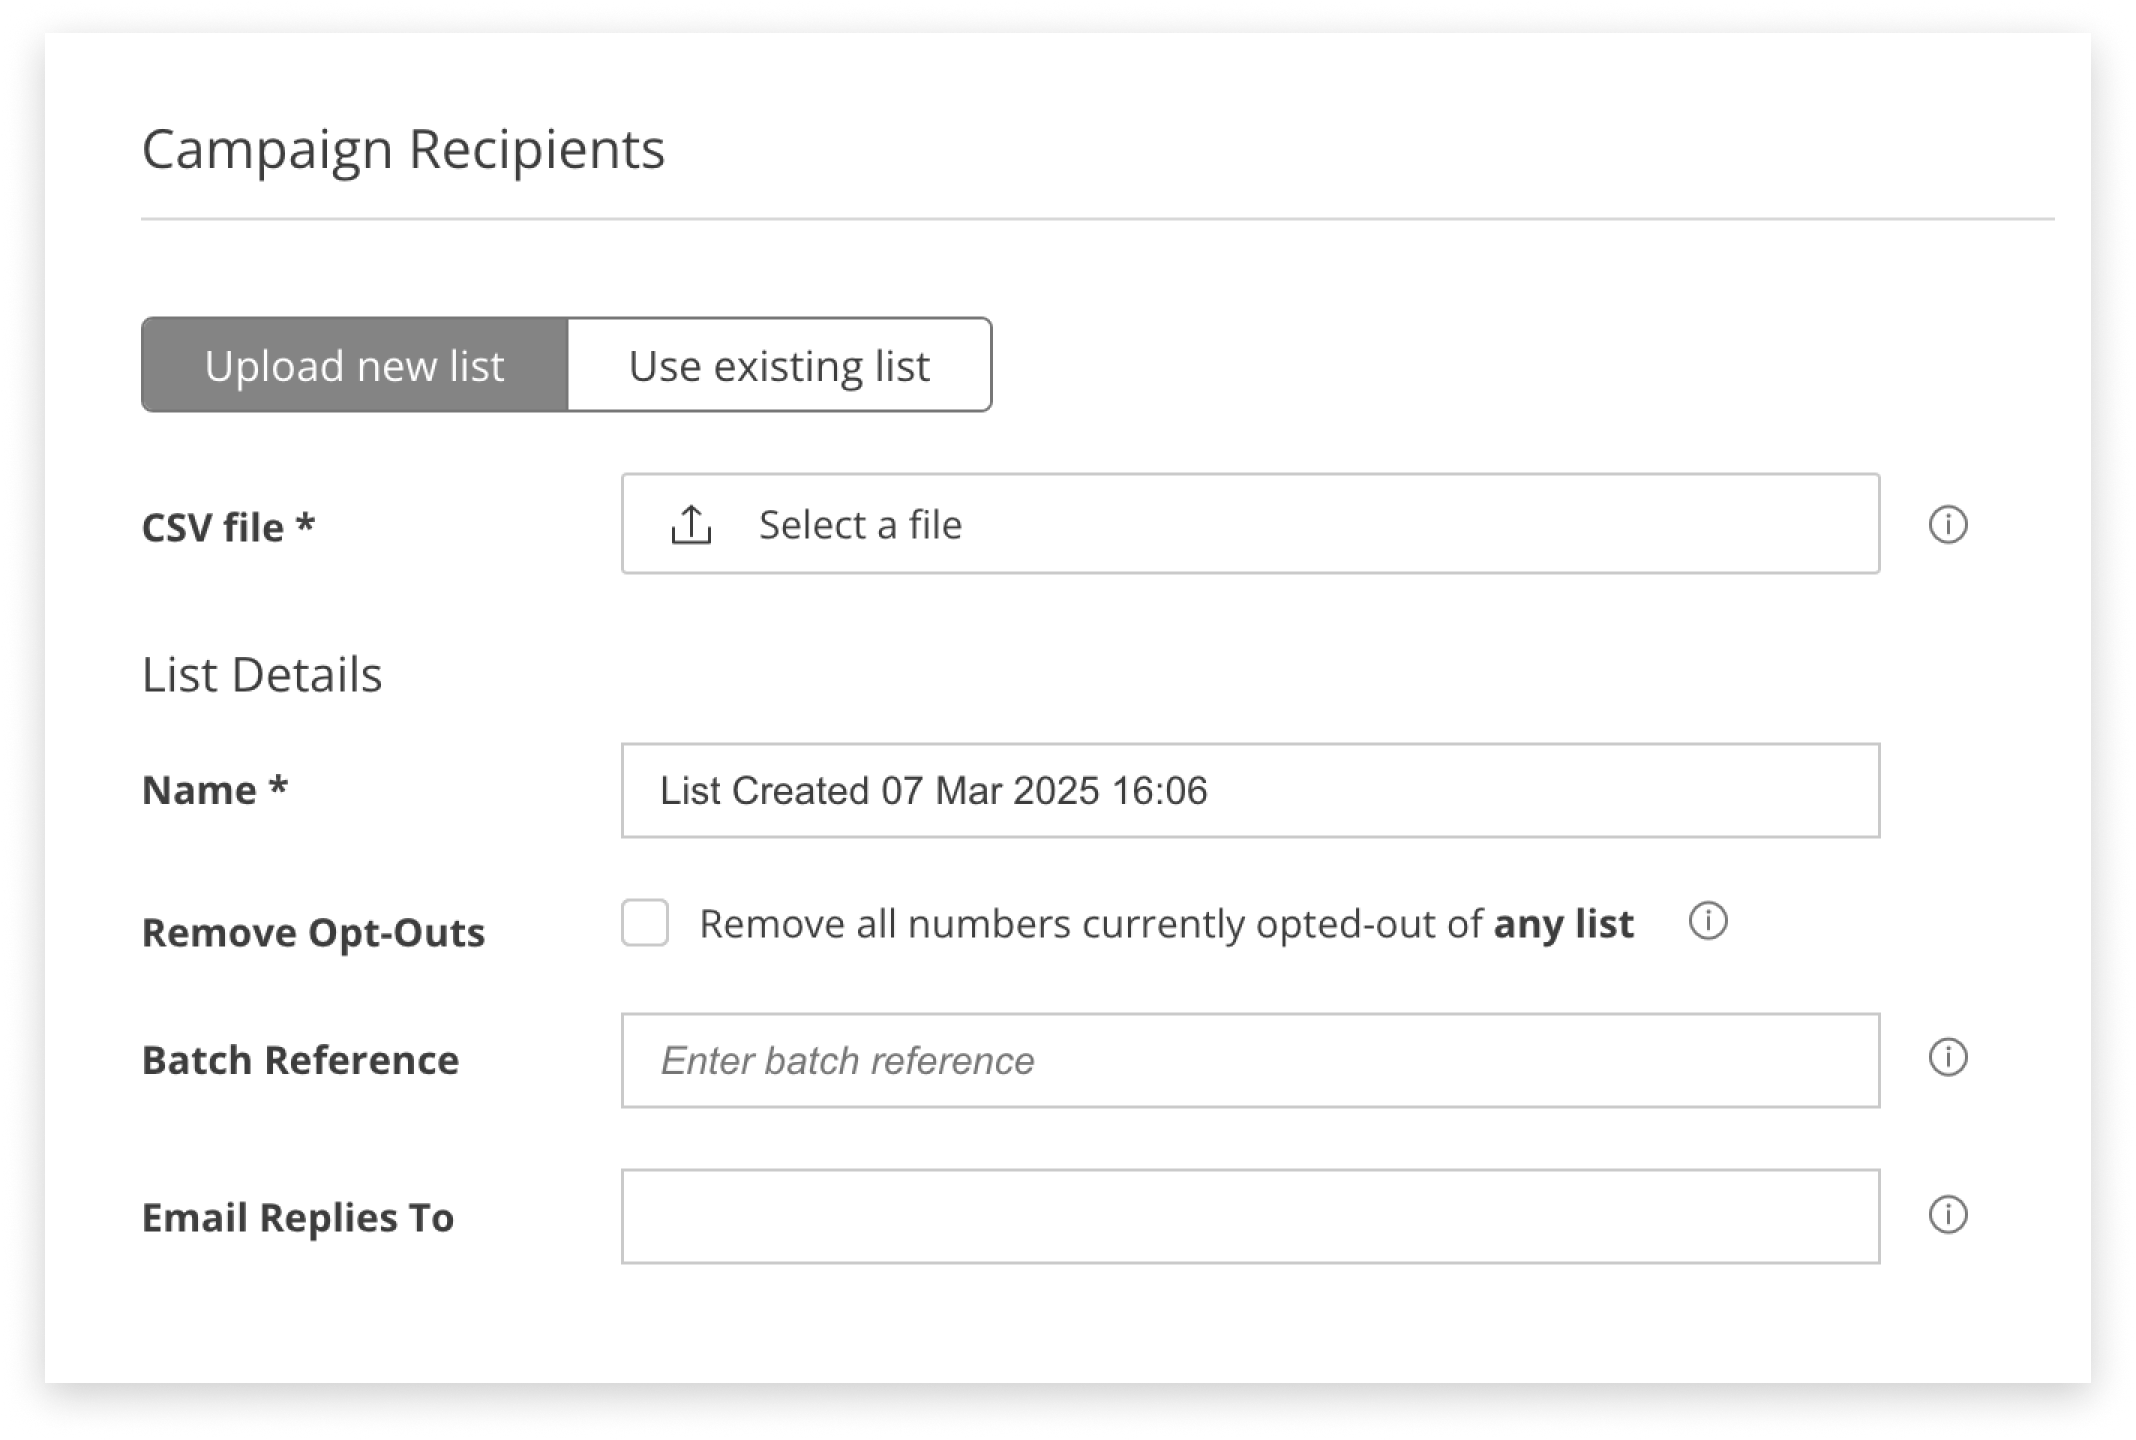
Campaign Recipients (Lists)
There are two options for sending campaigns; upload new recipients in a List. Or, use an existing list.
Lists are how you broadcast SMS via Campaign Manager; for conversational messaging, please use our Web2SMS application.
Getting Lists Ready
The only detail required for a recipient on a list is a mobile number. However, additional parameters can personalise campaigns.
To begin preparing your list file, either download this CSV template or create your own.
If creating your own:
- Mobile numbers must be in the first (left) column
- Parameter 1, Parameter 2, 3, 4, 5… out to Parameter 6 in the following columns
Visit the CSV formatting section for more information.
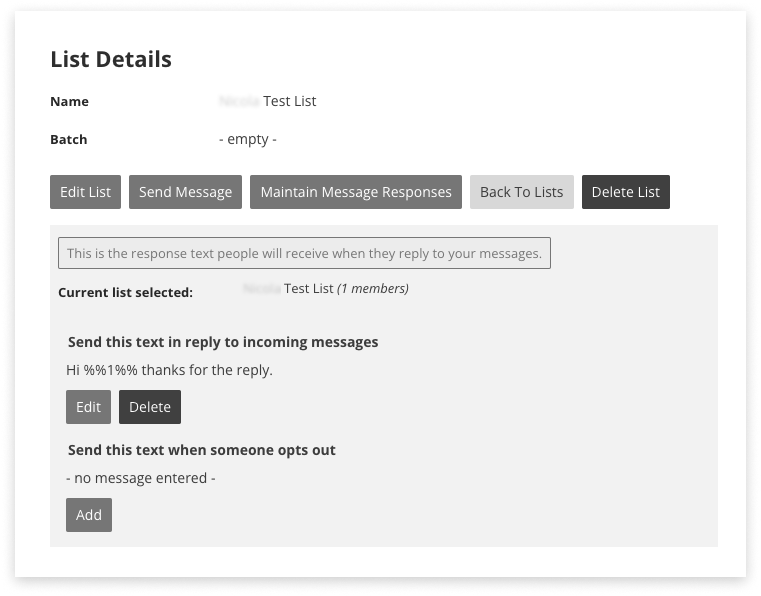
Manage Lists
There are many options available to manage Lists of recipients:
Add List with CSV

Create an Empty List
Adding to a List

Edit Members in a List
Remove Members from a List
Edit List Details
Download a List
Deleting a List
Create a List While Sending
Message Content
Select from a template or write a message on the fly.
How to create a template and how to personalise a template is covered in greater detail elsewhere.
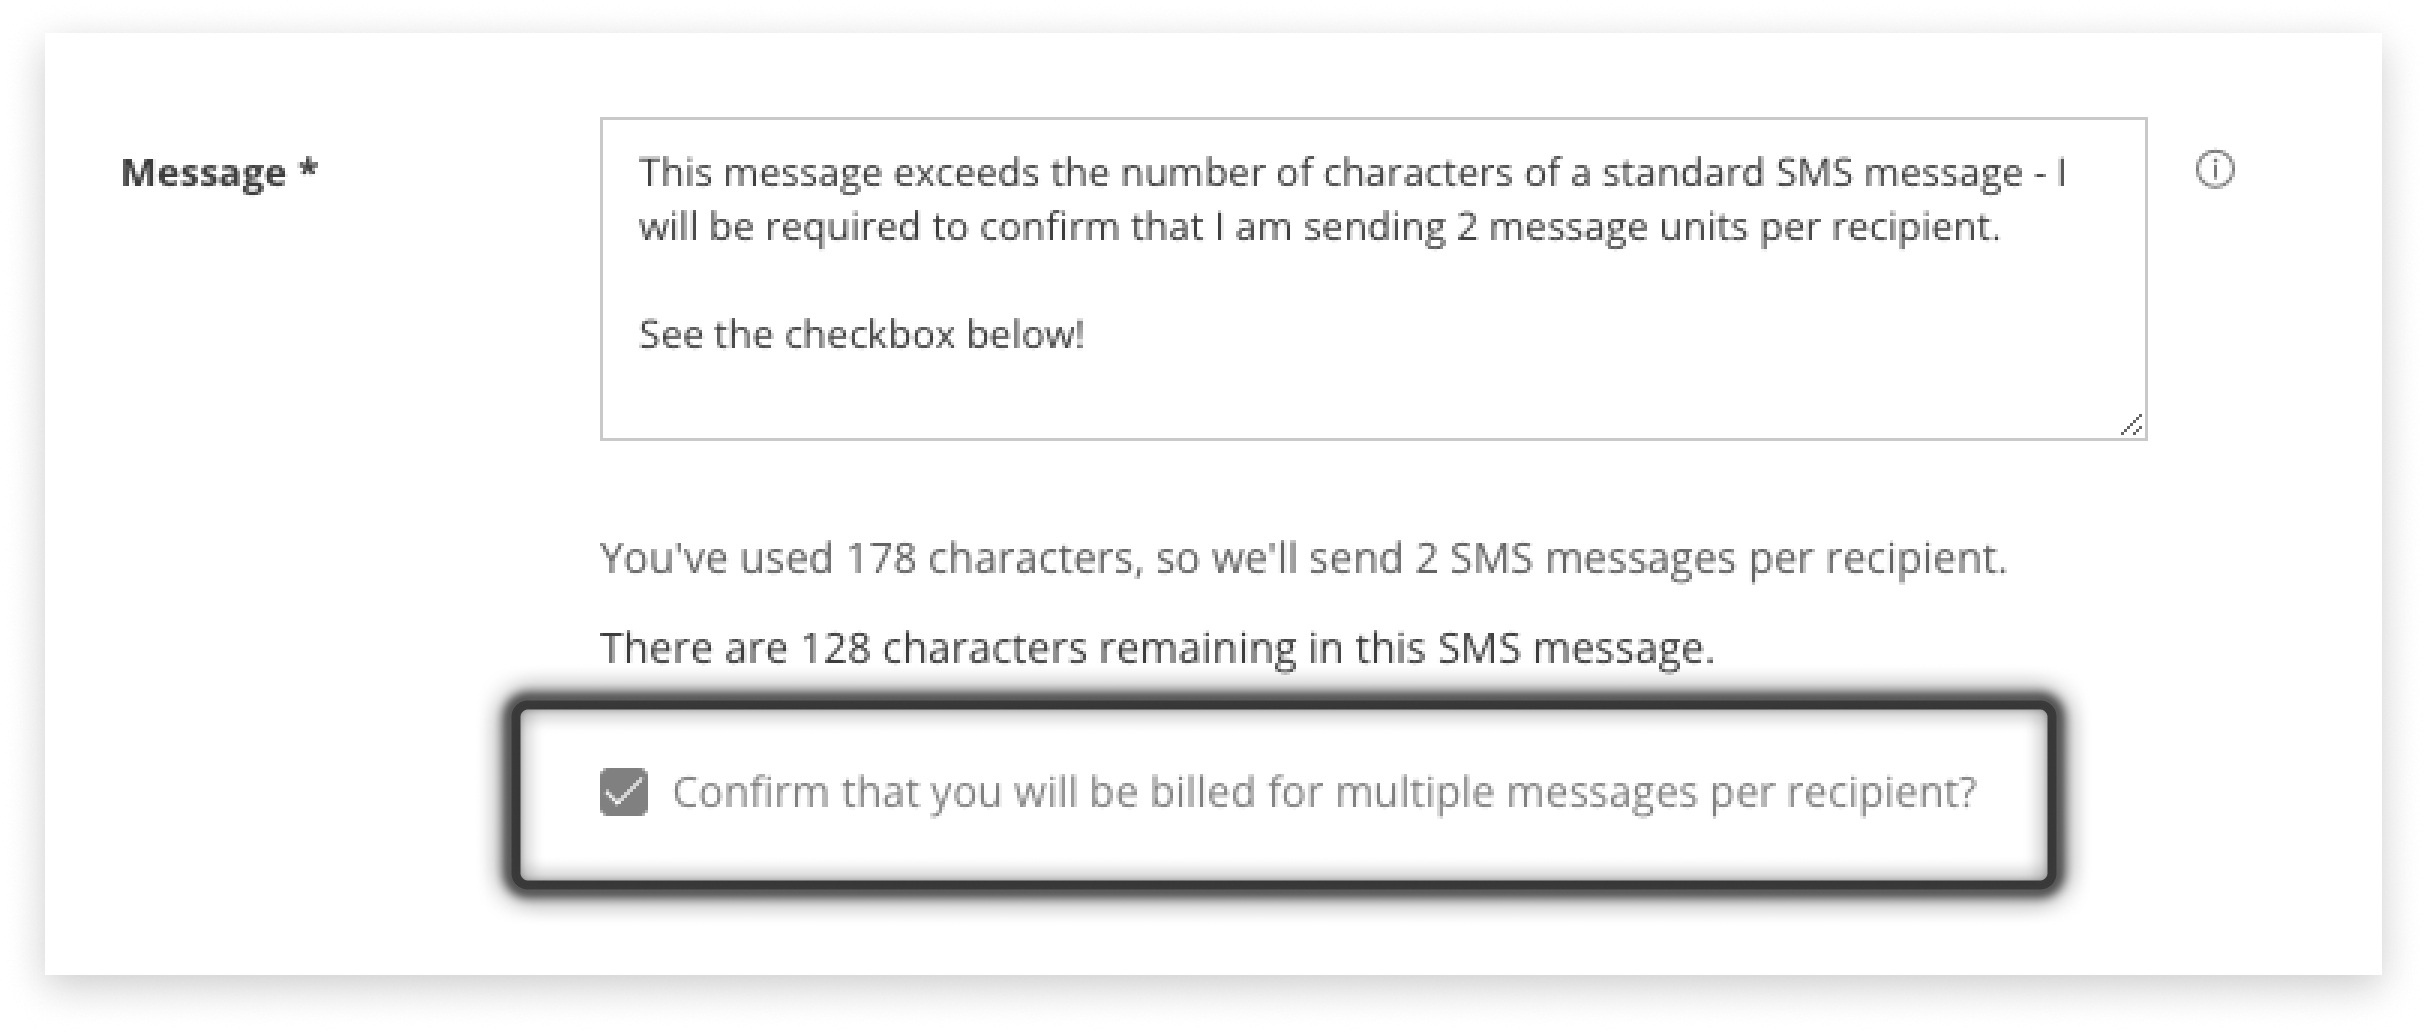
- Note: parameters may impact the number of units being sent to each recipient.
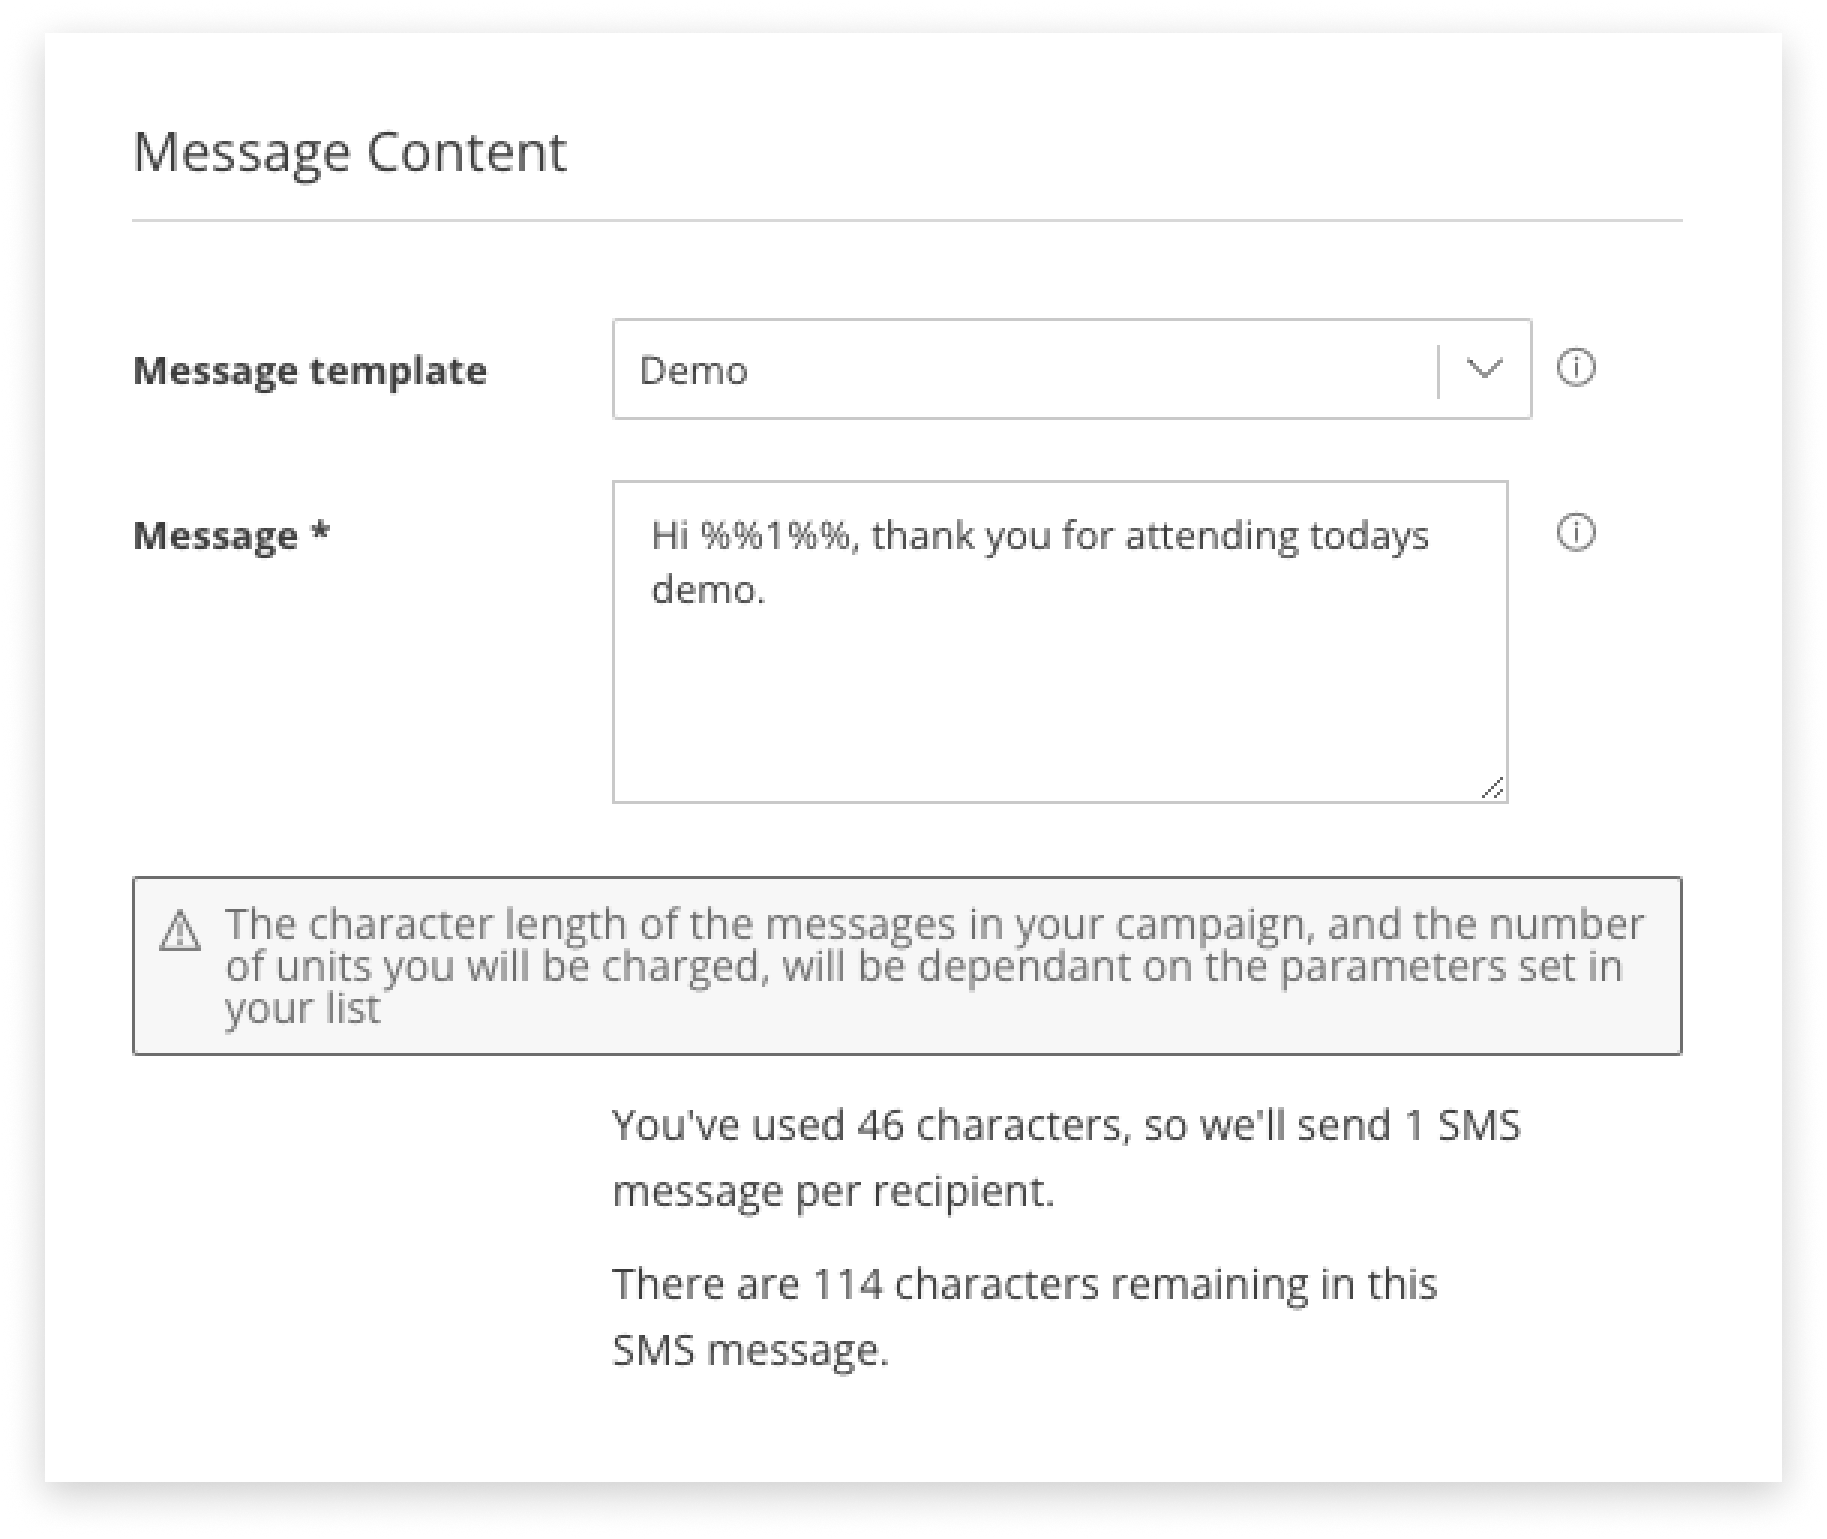
If your base message / base template exceeds the number of characters per unit, an alert will display and you will be asked to acknowledge that you are sending more than 1 unit per recipient. More information on character limits and encoding is available.
Templates can be used by all staff with access to the Campaign Manager application the template is saved to.
Templates act as a starting-point for communications at the time of sending.
They are editable by staff members with the permission to send messages.
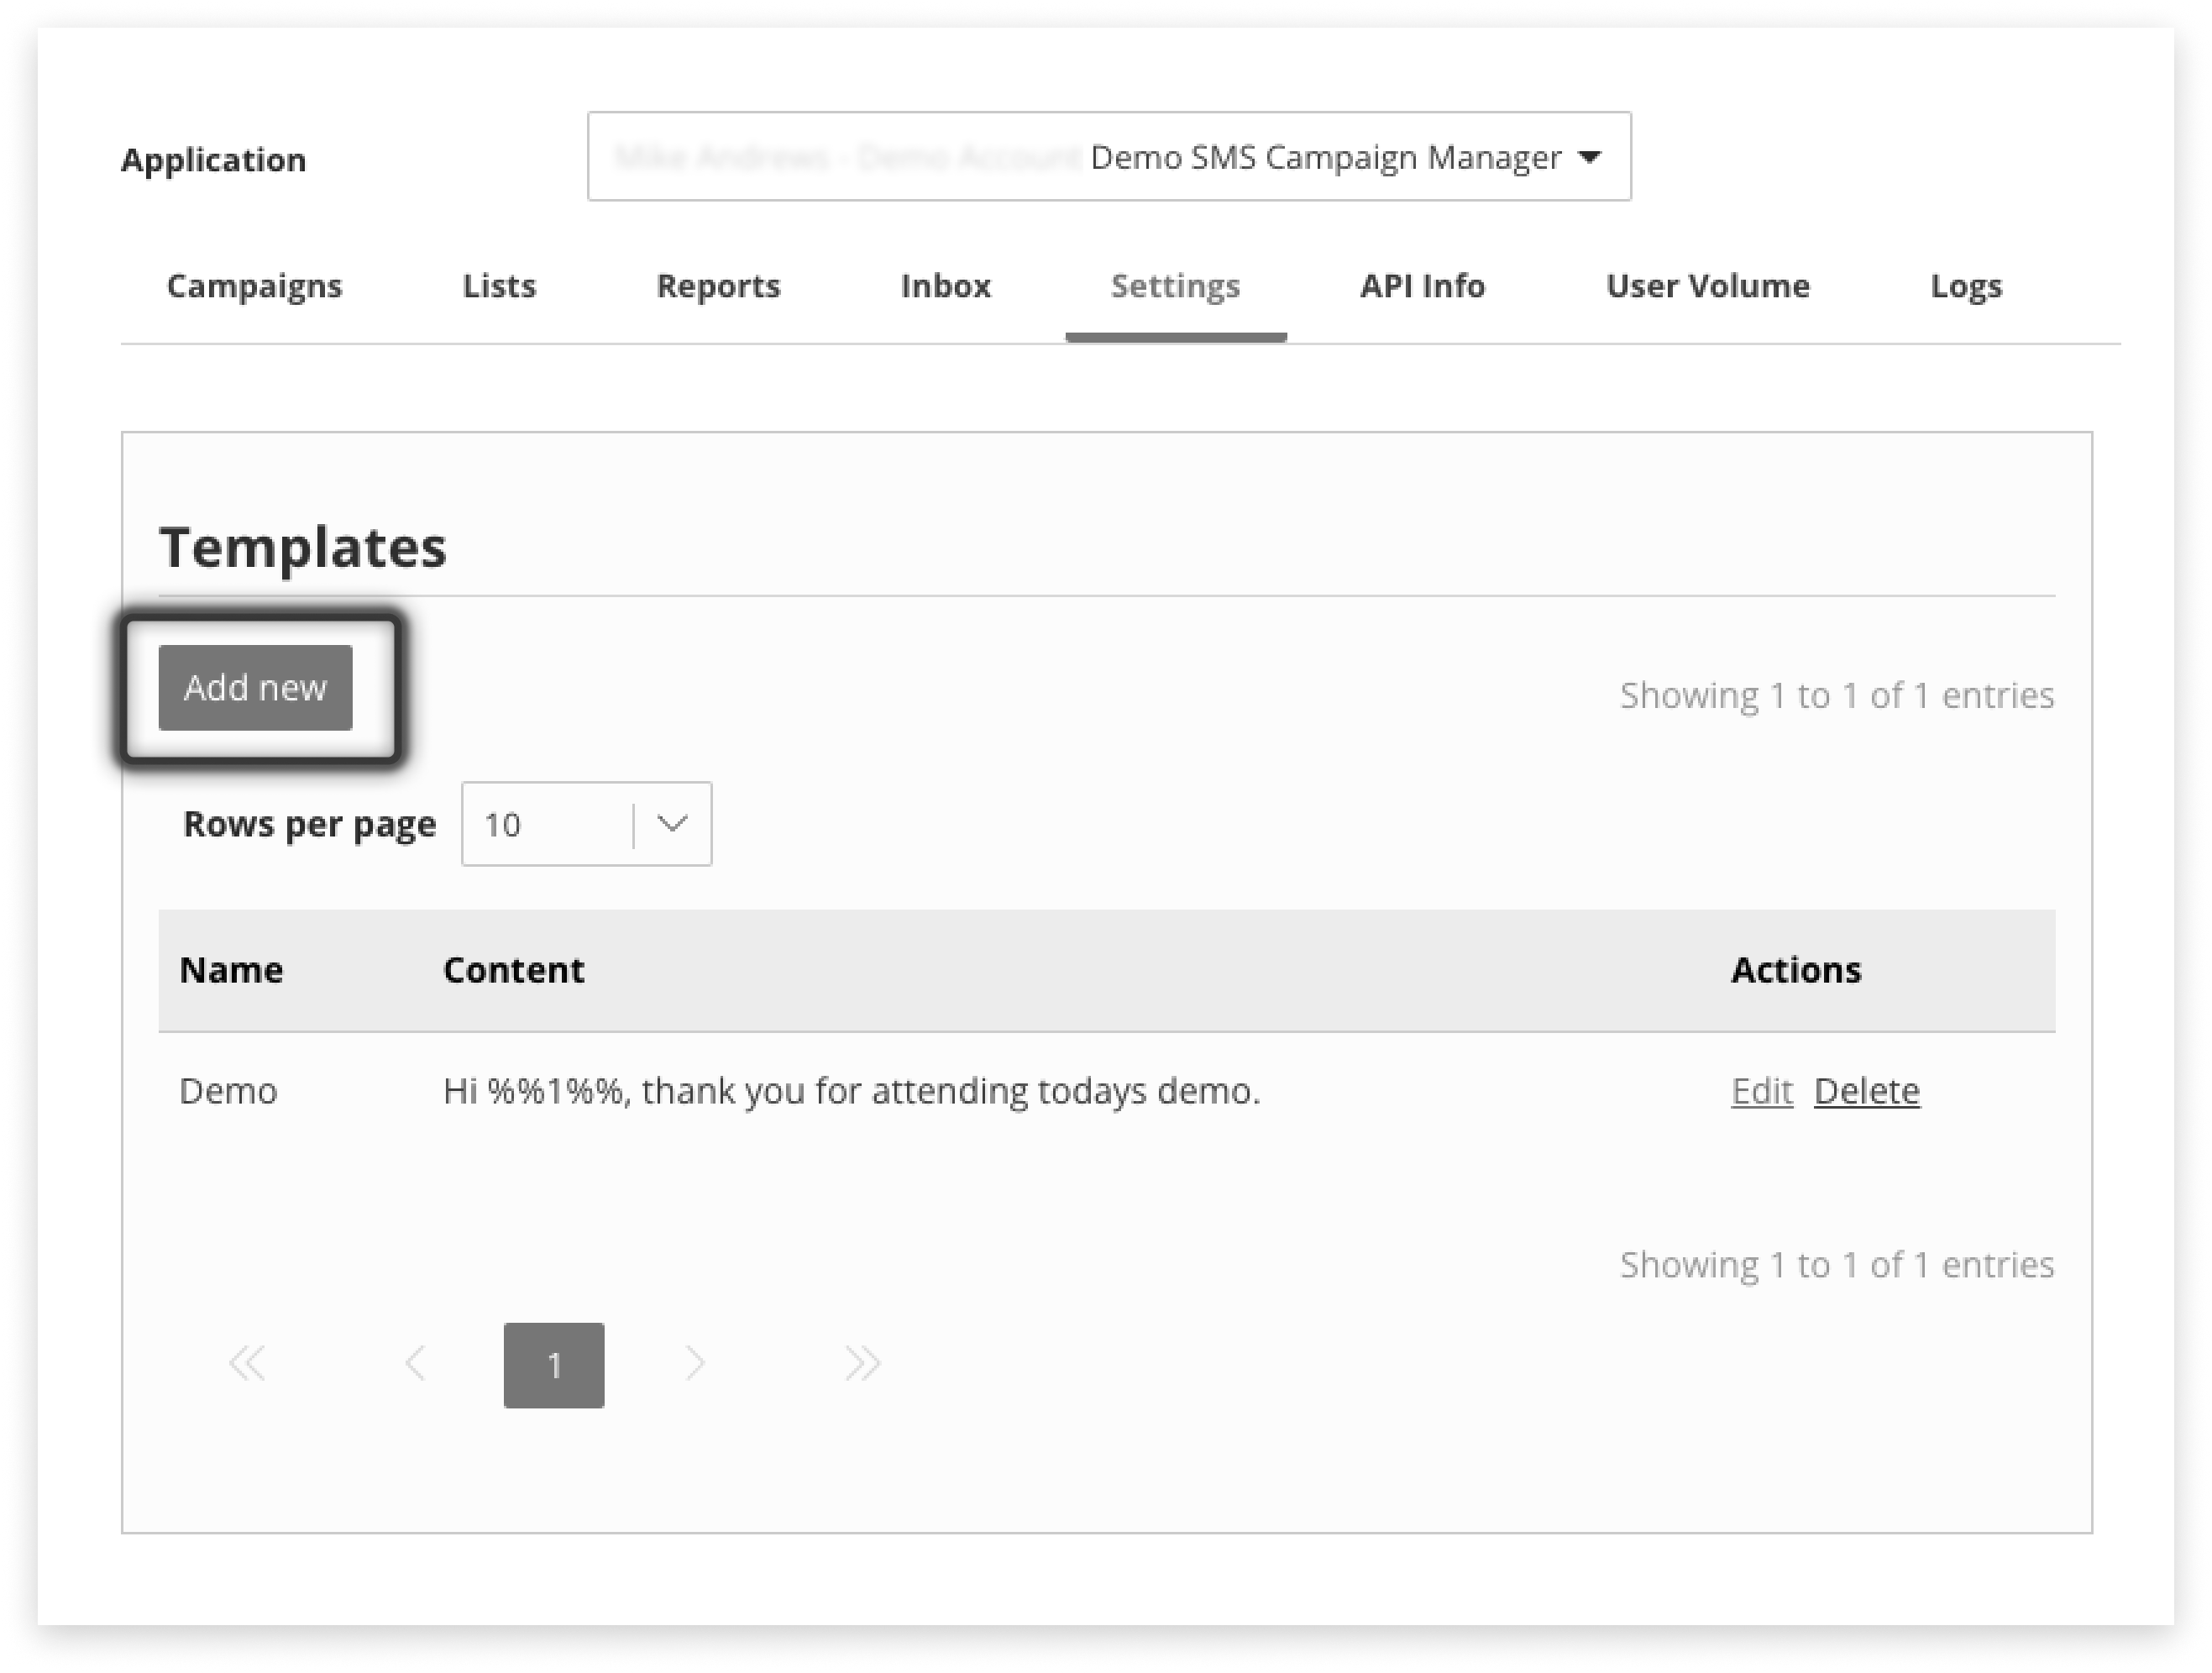
Templates
-
Navigate to the Settings tab in Campaign Manager
-
In the Template section, click the ‘Add New’ button
-
Enter a memorable Name for your template
-
Write the templated message
-
Click ‘Save’
Editing or Deleting a Template
Parameters
Parameters can be used in two ways, one for customising messages to recipients, and the other for helping with reporting and filtering.
-
Use names, dates/times of appointments, or unique links as parameters to efficiently customise templated messages
-
Include labels such as role, location, etc in spare parameters (those not used within a message) to help with reporting later on
Lists can then be created/uploaded with matching parameters. Create your own or download a template CSV to get started. The character limit per parameter is 50.
For Customising Messages
Below is an example for how parameters can bet set up and will be applied in a message:
Example List for Parameter Use
| Parameter 1 | Parameter 2 | Parameter 3 |
|---|---|---|
| Tania | Edgewater | Sat at 2pm |
| Malcolm | Tamworth | Sat at 2pm |
| Annie | Pickleberry | Sat at 3pm |
| Gaurav | Ormiston | Sun at 9am |
Example Template Message
Hi %%1%%, your appointment at %%2%% is on %%3%%. Reply CALL to reschedule.
-
%%1%% will be replaced in each message by Tania, Malcolm, Annie, or Gaurav
-
%%2%% will be replaced by Edgewater, Tamworth, Pickleberry and Ormiston, etc
Example Personalised Message
Hi Tania, your appointment at Edgewater is on Sat at 2pm. Reply CALL to reschedule.
It is important to note that parameter content will be of different lengths. The character limit per parameter is 50.
For Reporting
Storing tags or labels against list members / recipients in unused parameters can help with later reporting. For example, you may choose to:
-
Use parameters 1, 2, and 3 in a message
-
Use parameters 4, 5 or 6 to store data about recipients; employee number, location, role, department, etc
When you later export a CSV with replies these fields can assist with reporting.
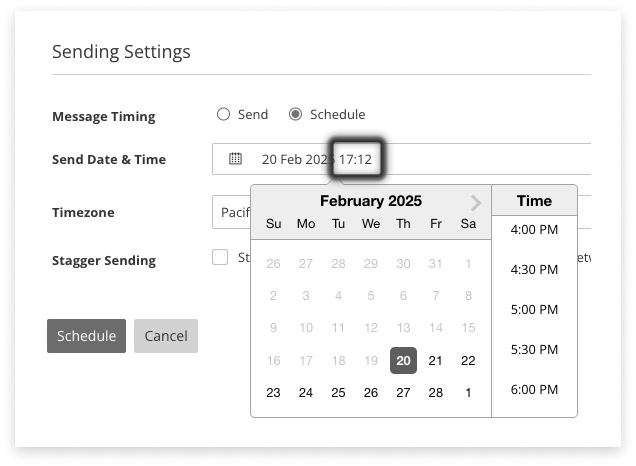
Timing of Sending
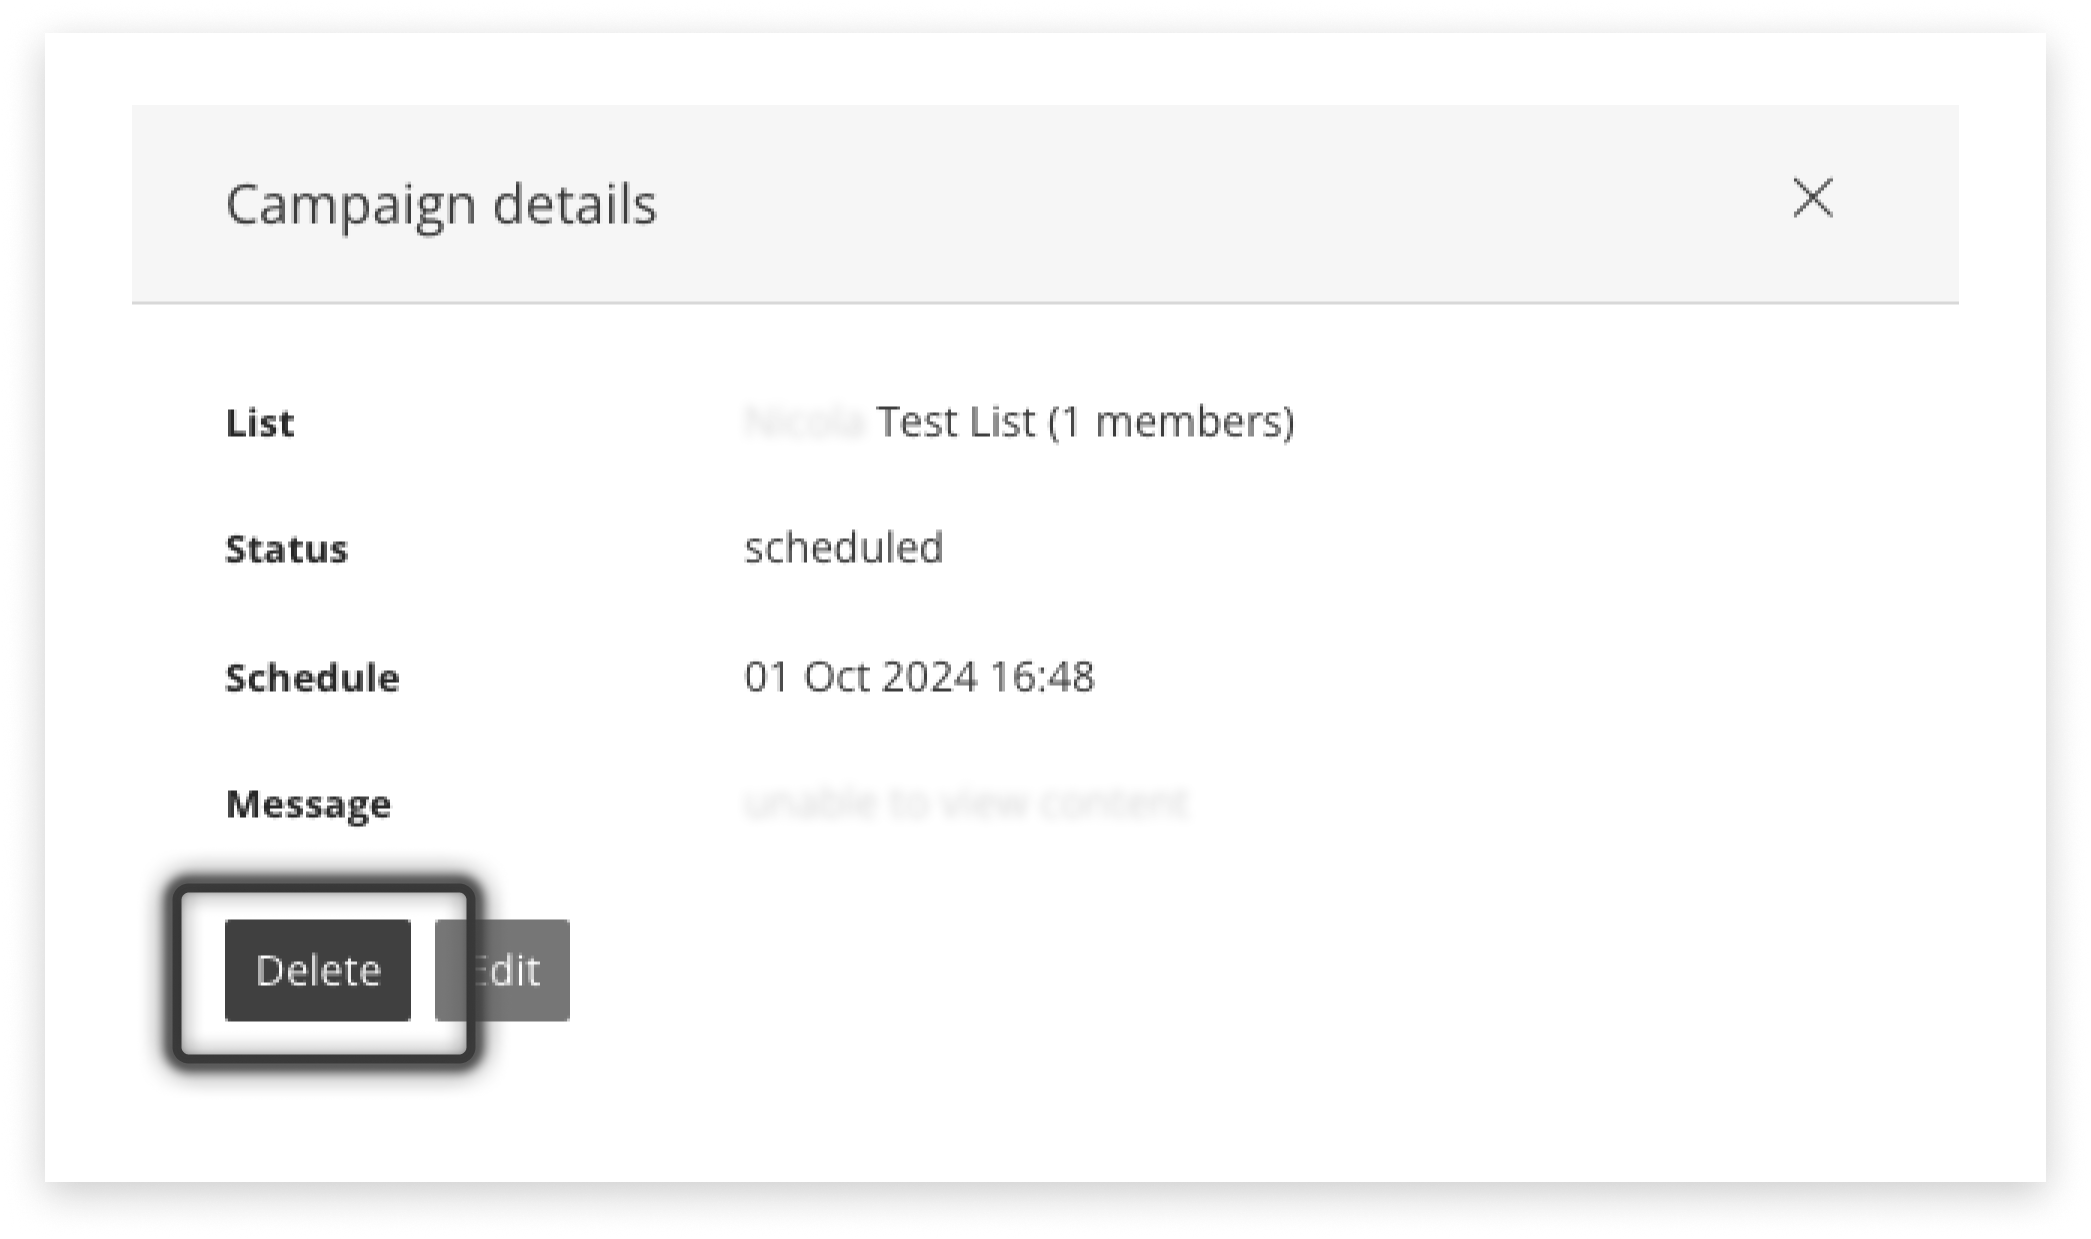
In the Campaign Settings area of the page, schedule a campaign for later or send it immediately.

Send Immediately
Schedule For Later
Delete Before Sending
Responses
Automatic responses can save you time and ensure recipients are kept well-informed.
Responses can be sent to acknowledge opt-outs, welcome opt-ins, or in response to any reply.
Responses can also be set at the global default (application-wide) level, or custom to a particular list.
Where to Set Responses
There are three locations in Campaign Manager to set automatic responses incoming messages:
- Default responses in the Settings tab
- List responses inside a List in the Lists tab. These will override Default responses, if set.
- Campaign response - when you create a Campaign for a new List. These will override Default responses, if set.
Set Default Responses
Set Responses for a List
Set Responses for a Campaign
Which Will Send?
If responses to a List, or responses to a Campaign are set, they will be sent in response to a reply.
The Default response will be sent out if neither Campaign or List responses are set.
Responses for Different Replies
Responses can be set in the Settings tab for incoming messages, opt-out messages, or opt-ins:
To Incoming Replies
To Opt Outs
To Opt-ins (Blank Keywords)
Monitoring Replies
Using the Inbox
The inbox is used to review sent campaigns, and see the content of replies as they come in.
Any keywords that are triggered are also captured and displayed.
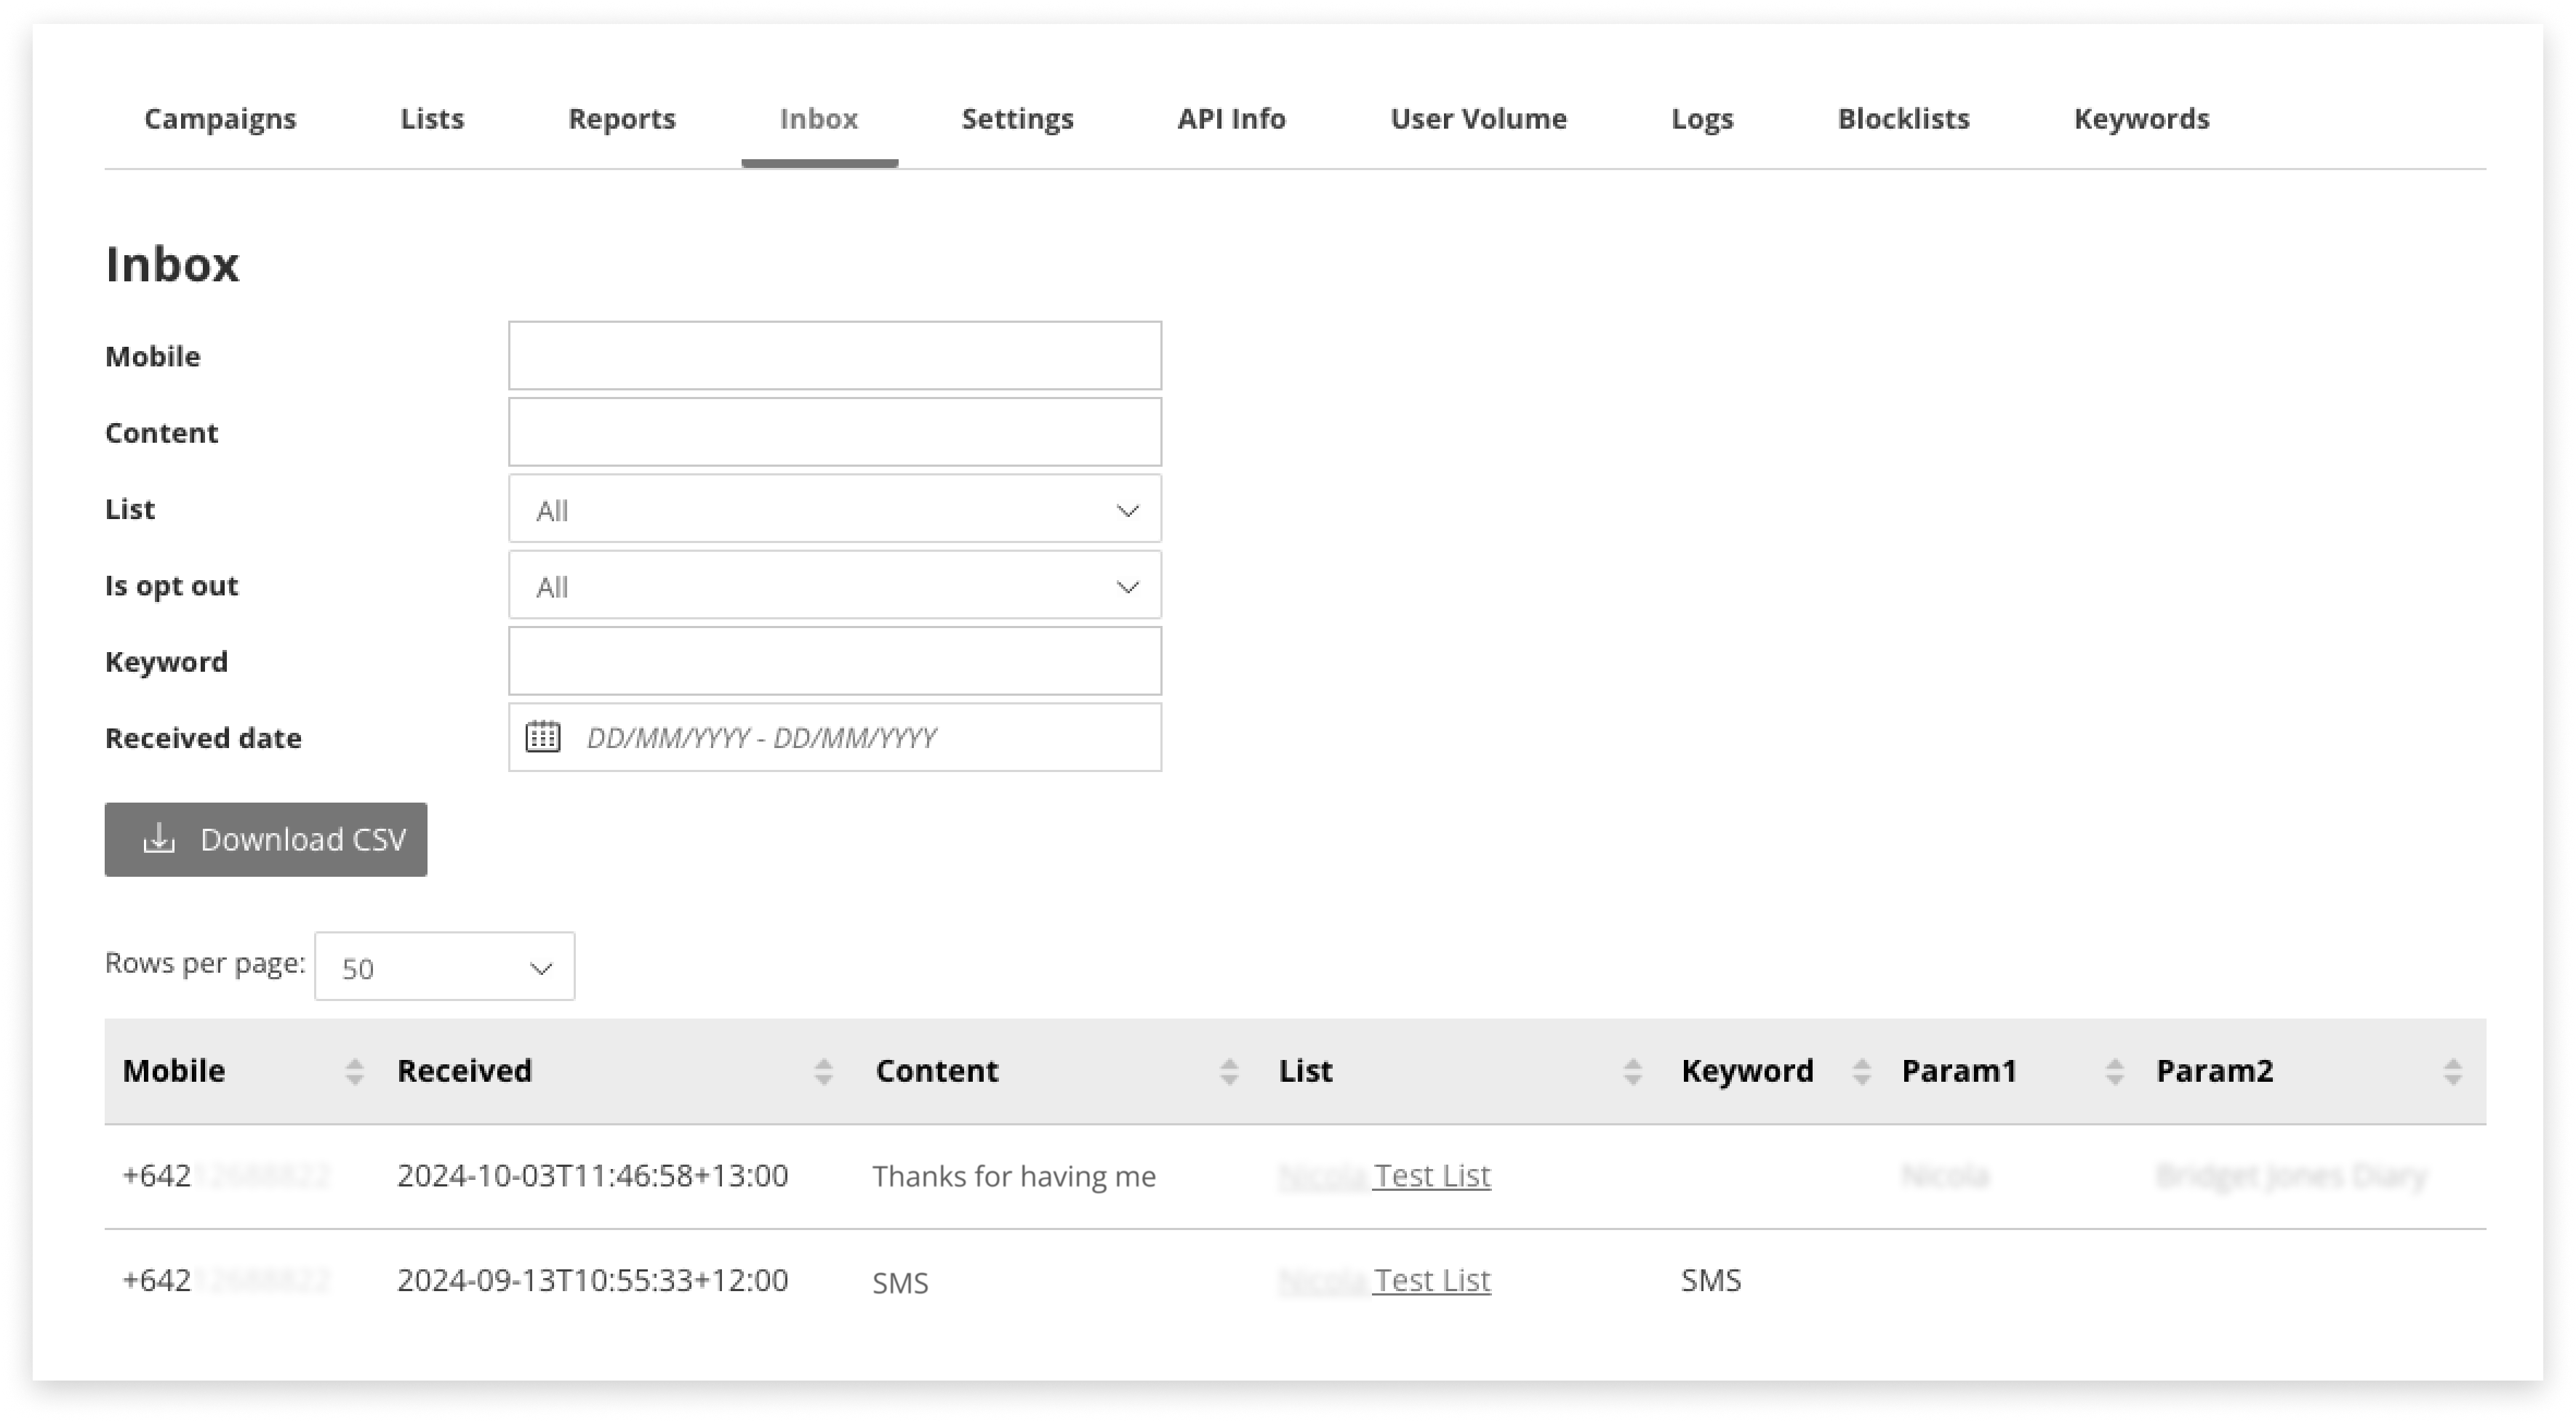
Parameters shown in the table were not necessarily used in the sent-message; they are just displayed as they were saved against the recipient/member of the List.
It is not possible to reply to messages directly from the Inbox.
If someone requests to be opted-out (without using the correct term to trigger the opt-out automatically) it is possible to manually opt-out recipients from the List sent to, from here. Click the blue Opt-Out button at the right of the table.
Download Inbox as CSV
This download includes all the columns visible on-screen, from Mobile to Parameter 6.
It also includes:
-
Reply_ID: also known as Message ID - this can be used for greater delivery detail in Mobile Report
-
List: the List this message was sent to
-
Batch: the optional attribute to help identify Lists
Forward Replies to Email
It is possible to forward SMS sent in response to a campaign onwards to an email address/domain that has been registered for the Email2SMS application.
We do not allow the forwarding of SMS to any email address as a security measure.
Contact your admin to have an Email2SMS set up.
This will cause all replies sent in response to this campaign to appear in an email. The mail will also include the message content sent in the campaign, for easy reference.
Reporting
Monitor Sending Progress
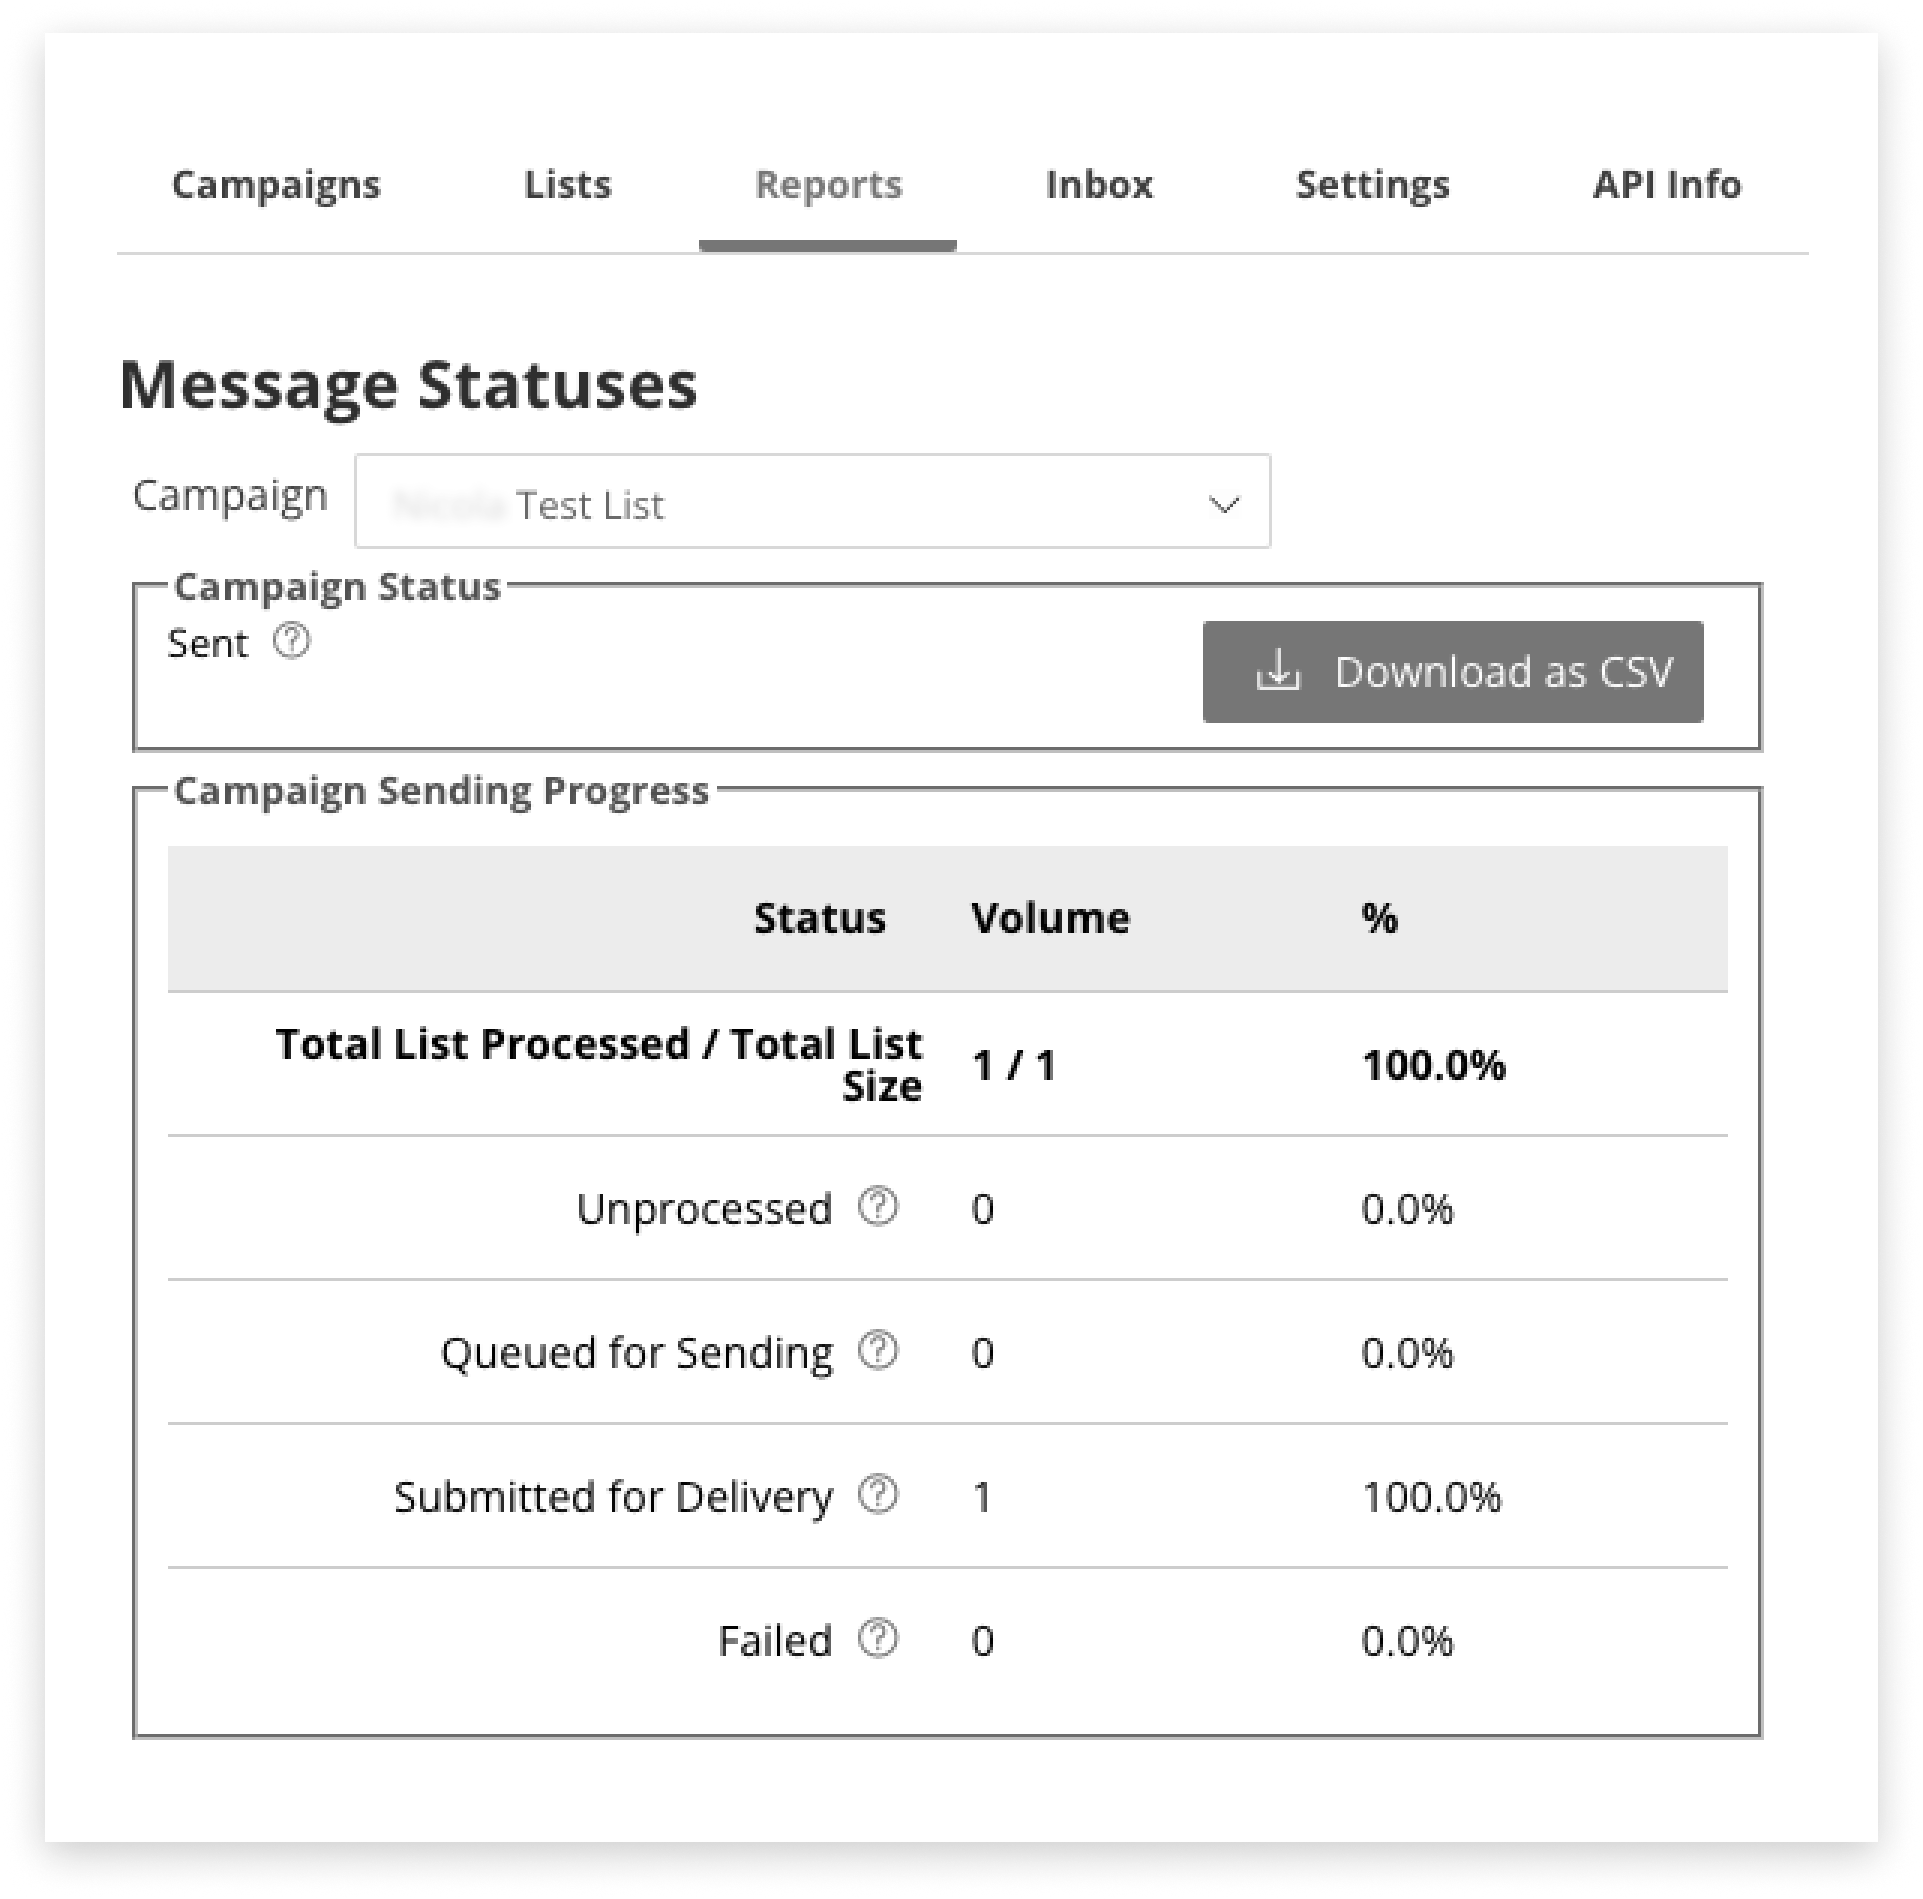
Check Opt-Outs by Campaign
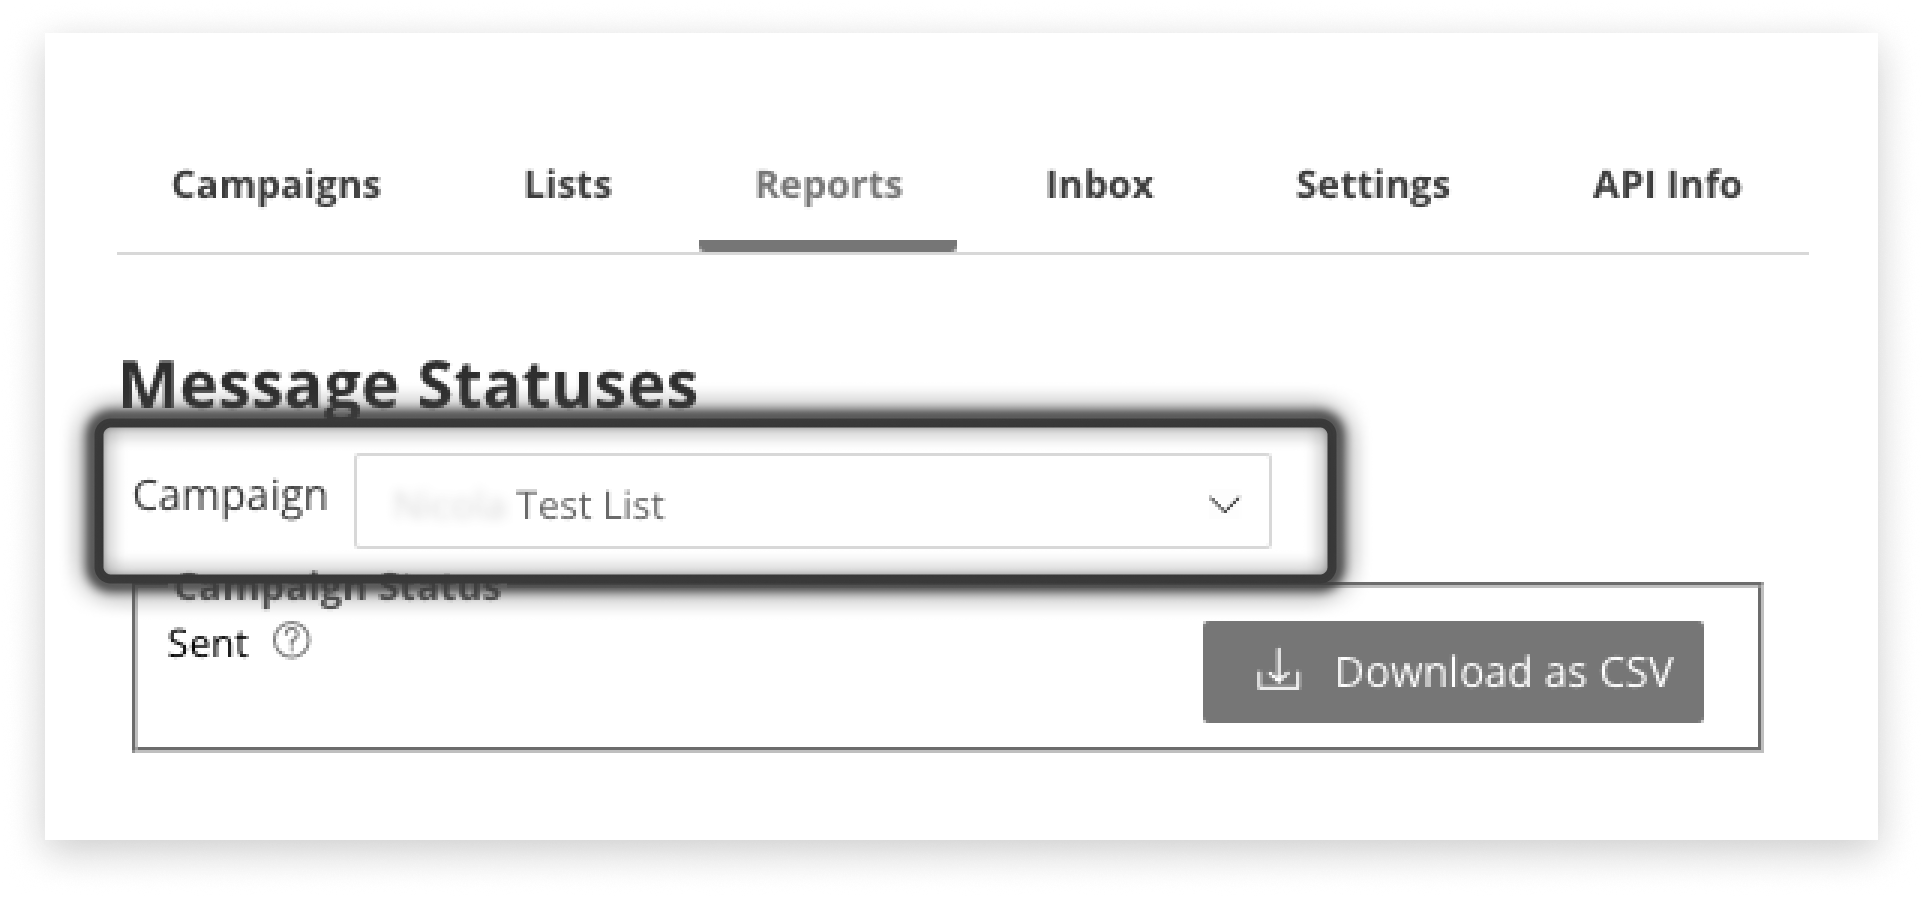
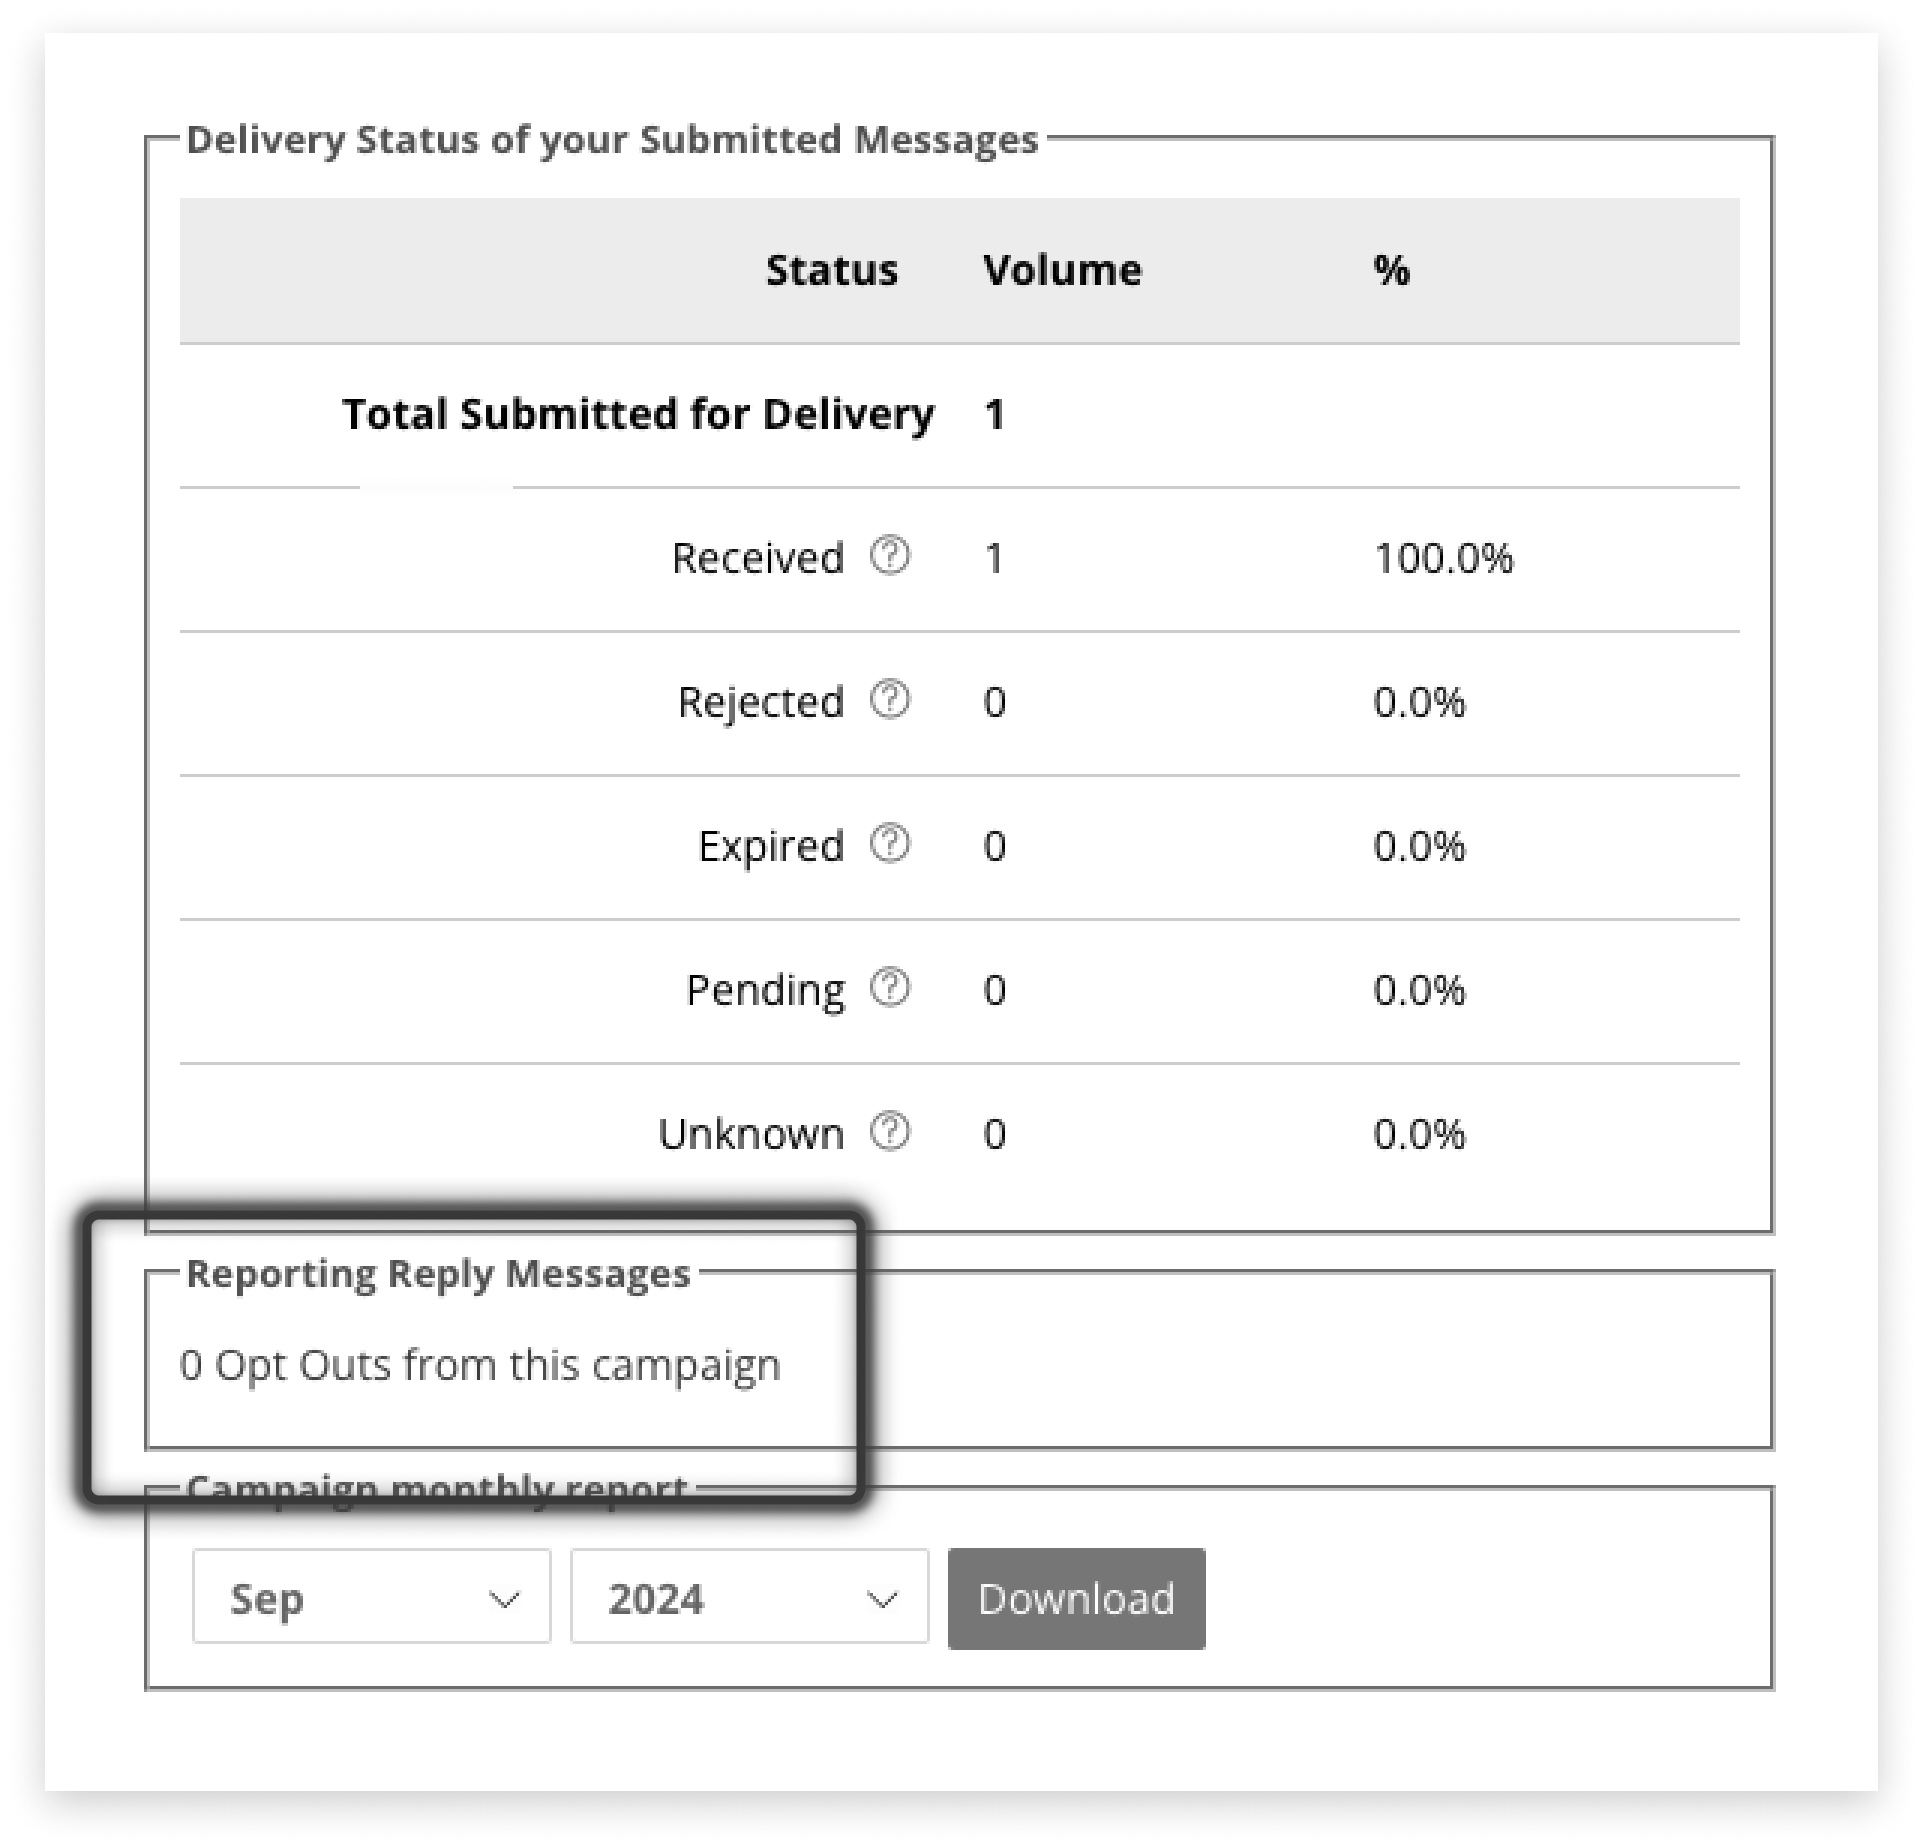
Report on a Campaign
Report on a Whole Month

Month’s Volume by User
Troubleshooting
Reviewing Sending Activity
Visit the Logs tab in Campaign Manager to review campaigns that were scheduled or edited in the application over a period of time.
Formatting CSV for List Upload
Use the provided CSV template or format your own file following the rules below:
-
Mobile numbers must go in the first (left-hand) column
-
Format this column to have zero decimal places
-
Use international format for Mobile numbers:
- With the + symbol, e.g. +64xxxx…
- Without the + symbol, e.g. 64xxxxx…
- If Prefix Mapping has been set up correctly, using the local format will also work, e.g. 027…
-
The Mobile number must be 7 to 14 digits long to be valid
-
If using parameters, enter them in the columns to the right-hand-side of the mobile number column
- Parameters must be shorter than 50 characters long
- Maximum of 6 parameters
-
Save the file as a CSV
If using a .txt file, use a comma (‘ , ‘) to separate Mobile numbers, not a semicolon (‘ ; ‘).
Check Mobile numbers are formatted correctly by opening the CSV file in a plain text editor such as Notepad (Windows) or TextEdit (Mac). Look to see if the program you are using to edit the CSV was inserting or removing characters unexpectedly.
Keywords not Working
Ensure the keyword is active, and that it does not contain a space.